
You are using an out of date browser. It may not display this or other websites correctly.
You should upgrade or use an alternative browser.
You should upgrade or use an alternative browser.
[GFX] MSI Twin Frozr Club
- Thread starter tErOn
- Start date
More options
Who Replied?
clon22
Suspended
- Joined
- Mar 31, 2004
- Messages
- 9,070
- Reaction score
- 0
Yeah bro.

Wrong reply
Welcome to da club!
welcome to the club
Ty boss!

clon22
Suspended
- Joined
- Mar 31, 2004
- Messages
- 9,070
- Reaction score
- 0
Just curious, when is the z87 MPower Max launching in Singapore?
Looks like a excellent option to upgrade next.
Thanks.
Usually flagship ones will arrive 1st but I'm not sure of the dates.
MSI Facebook will probably spam it around the globe once its nearing. :S
any1 can tell me how to overclock my MSI TF HD7870? any noob guide to overclock of gpu??
Keyoke bro posted on very detailed guide previously.
Need to dig it out.

- Joined
- Jul 14, 2005
- Messages
- 37,841
- Reaction score
- 10,088
Lemme retype it. Teron bro, if can help me paste it at the front ba. Easier for reference.
Steps for overclocking gpu:
Disclaimer: Please do note that overclocking is done at your own risk. I or corbell will nt cover any severe damage that is inflicted by careless overclocking.
1. Download MSI Afterburner, GPU-Z, 3D Mark 11 and Furmark via the links below:
MSI Afterburner (For overclocking):
MSI Afterburner
GPU-Z (For monitoring of clock speed, vrm temperature and gpu core temperature:
GPU-Z Video card GPU Information Utility
Furmark (Stress testing of GPU core for maximum core temperature):
FurMark: VGA Stress Test, Graphics Card and GPU Stability Test, Burn-in Test, OpenGL Benchmark and GPU Temperature | oZone3D.Net
Benchmark Software such as 3D Mark 11:
3DMark 11 - DirectX 11 video card benchmark from Futuremark
2. After downloading and installing the software, launch MSI Afterburner.
You will see something like the screenshot below:

Core Voltage: Increase the voltage to your GPU if more power is needed for the overclock. This is disabled by default.
PLEASE DO NOT USE THIS IF YOU HAVE NO EXPERIENCE IN OVERCLOCKING AS OVERVOLTING MIGHT DAMAGE THE GPU AND BURN THE CARD!
Core Clock: Increase this to overclock your GPU
Shader Clock: Shader clock is 2 x Core Clock. If you increase the Core clock, the shader clock will increase accordingly.
Memory Clock: Increase this to overclock the memory clock speed which has little influence in the performance of the graphics card
Fan Speed: Allows you to adjust the fan speed (Manual/Auto)
3. For experience overclocker whom wants to unlock voltage control (allows you to adjust Core Voltage in MSI Afterburner), please perform Step Number 3, else skip to step 4.

4. Now, increase core clock by 10-20mhz or more.
5. Launch GPU-Z and make sure that GPU Clock is increased by the speed which you set in step 4.For
e.g. Default clock = 850Mhz. You overclock the GPU by 20Mhz, Hence you should see 870Mhz at GPU Clock.

6. After doing so, test for stability of the card by playing games (if you dont want to waste time to sit down and watch the benchmark) or run 3D Mark 11.
a. During this process, if your GPU suffers from artifacts or you start seeing funny coloured dots appearing on the screen (refer to screenshot below)
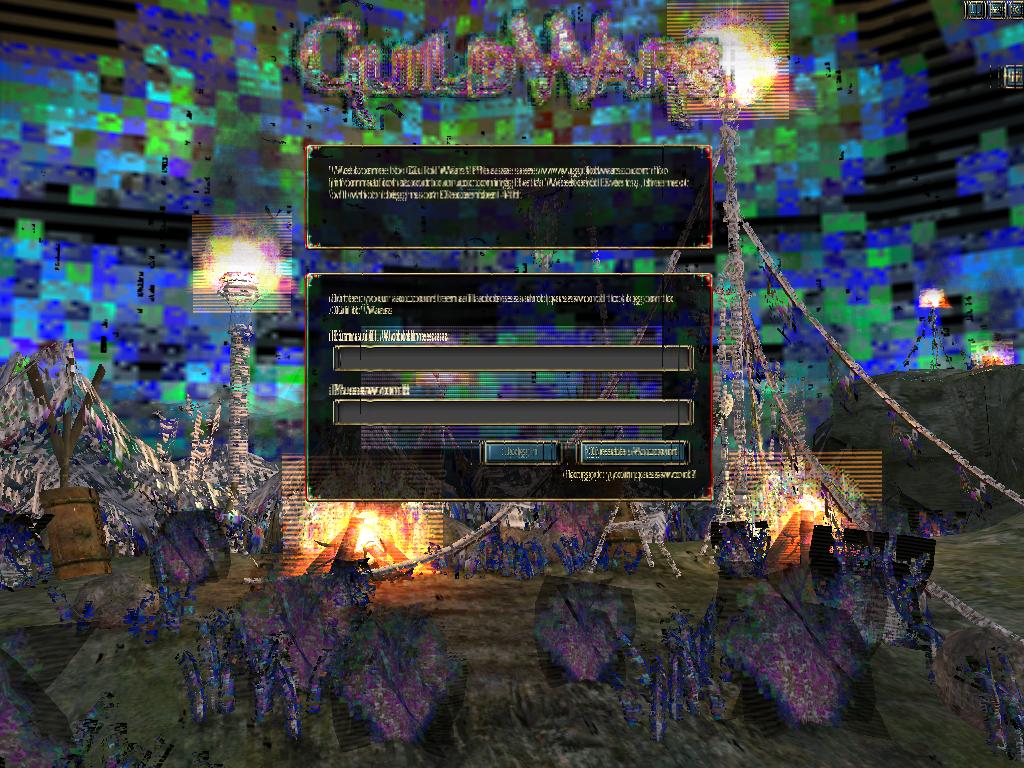
OR
b. Display driver starts crashing:

OR
c. Computer starts to hang
You should then:
Lower the clock speed by 10Mhz and repeat Step 6 again till 6a, 6b and 6c stops happening, then, that will be the maxmimum clock speed which the GPU can sustain under gaming load.
OR
Increase COre Voltage 1 notch at a time till 6a, 6b and 6c stops happening.
7. After that, stop the benchmark and launch Furmark

Go under settings and ensure that the "Extreme burn in" option is ticked.
8. Launch GPU-Z, under the sensor tab, you can monitor the GPU temp and VRM temp

9. Click on "Burn-in Test" to start the furmark and monitor the GPU and VRM temperature for at least 45mins to an hour.
10. As a safe threshold, I will recommend that the GPU temp does not exceed 85 degree celcius and VRM temp does not exceed 90 degree celcius.
11. If temperature and overclock is stable, you can push the card performance further by repeating step 4-9 again.
SIDE NOTE:
If you intend to run @ OC speeds,
never run @ max OC speeds.
Always drop by 30-50Mhz from your max OC stable speeds to give some buffer allowance
in case of any voltage spikes/drops.
Steps for overclocking gpu:
Disclaimer: Please do note that overclocking is done at your own risk. I or corbell will nt cover any severe damage that is inflicted by careless overclocking.
1. Download MSI Afterburner, GPU-Z, 3D Mark 11 and Furmark via the links below:
MSI Afterburner (For overclocking):
MSI Afterburner
GPU-Z (For monitoring of clock speed, vrm temperature and gpu core temperature:
GPU-Z Video card GPU Information Utility
Furmark (Stress testing of GPU core for maximum core temperature):
FurMark: VGA Stress Test, Graphics Card and GPU Stability Test, Burn-in Test, OpenGL Benchmark and GPU Temperature | oZone3D.Net
Benchmark Software such as 3D Mark 11:
3DMark 11 - DirectX 11 video card benchmark from Futuremark
2. After downloading and installing the software, launch MSI Afterburner.
You will see something like the screenshot below:
Core Voltage: Increase the voltage to your GPU if more power is needed for the overclock. This is disabled by default.
PLEASE DO NOT USE THIS IF YOU HAVE NO EXPERIENCE IN OVERCLOCKING AS OVERVOLTING MIGHT DAMAGE THE GPU AND BURN THE CARD!
Core Clock: Increase this to overclock your GPU
Shader Clock: Shader clock is 2 x Core Clock. If you increase the Core clock, the shader clock will increase accordingly.
Memory Clock: Increase this to overclock the memory clock speed which has little influence in the performance of the graphics card
Fan Speed: Allows you to adjust the fan speed (Manual/Auto)
3. For experience overclocker whom wants to unlock voltage control (allows you to adjust Core Voltage in MSI Afterburner), please perform Step Number 3, else skip to step 4.
4. Now, increase core clock by 10-20mhz or more.
5. Launch GPU-Z and make sure that GPU Clock is increased by the speed which you set in step 4.For
e.g. Default clock = 850Mhz. You overclock the GPU by 20Mhz, Hence you should see 870Mhz at GPU Clock.
6. After doing so, test for stability of the card by playing games (if you dont want to waste time to sit down and watch the benchmark) or run 3D Mark 11.
a. During this process, if your GPU suffers from artifacts or you start seeing funny coloured dots appearing on the screen (refer to screenshot below)
OR
b. Display driver starts crashing:
OR
c. Computer starts to hang
You should then:
Lower the clock speed by 10Mhz and repeat Step 6 again till 6a, 6b and 6c stops happening, then, that will be the maxmimum clock speed which the GPU can sustain under gaming load.
OR
Increase COre Voltage 1 notch at a time till 6a, 6b and 6c stops happening.
7. After that, stop the benchmark and launch Furmark
Go under settings and ensure that the "Extreme burn in" option is ticked.
8. Launch GPU-Z, under the sensor tab, you can monitor the GPU temp and VRM temp
9. Click on "Burn-in Test" to start the furmark and monitor the GPU and VRM temperature for at least 45mins to an hour.
10. As a safe threshold, I will recommend that the GPU temp does not exceed 85 degree celcius and VRM temp does not exceed 90 degree celcius.
11. If temperature and overclock is stable, you can push the card performance further by repeating step 4-9 again.
SIDE NOTE:
If you intend to run @ OC speeds,
never run @ max OC speeds.
Always drop by 30-50Mhz from your max OC stable speeds to give some buffer allowance
in case of any voltage spikes/drops.
Last edited:

clon22
Suspended
- Joined
- Mar 31, 2004
- Messages
- 9,070
- Reaction score
- 0
Wow! Awesome!
Thanks bro!
Boss Teron can quote on your thread opening post?
*Also one additional thing, if you intend to run @ OC speeds,
never run @ max OC speeds.
Always drop by 30-50Mhz from your max OC stable speeds to give some buffer allowance
in case of any voltage spikes/drops.
Thanks bro!
Boss Teron can quote on your thread opening post?
*Also one additional thing, if you intend to run @ OC speeds,
never run @ max OC speeds.
Always drop by 30-50Mhz from your max OC stable speeds to give some buffer allowance
in case of any voltage spikes/drops.
- Joined
- Jul 14, 2005
- Messages
- 37,841
- Reaction score
- 10,088
*Also one additional thing, if you intend to run @ OC speeds,
never run @ max OC speeds.
Always drop by 30-50Mhz from your max OC stable speeds to give some buffer allowance
in case of any voltage spikes/drops.
added in ur side note bro! forgot =.=!
Last edited:
- Joined
- Jul 14, 2005
- Messages
- 37,841
- Reaction score
- 10,088
The gpu overclocking guide should be have a thread of its own and be stickied as well. Thanks for the detailed guide!!@
no problem bro. im always glad to help fellow TFC members =) BECAUSE I AM THE ADVISOR!

Wow! Awesome!
Thanks bro!
Boss Teron can quote on your thread opening post?
u are welcome bro =)

Demonbecks
Senior Member
- Joined
- Feb 24, 2004
- Messages
- 1,362
- Reaction score
- 3
hi guys, need some assistance.
have a msi r7970 PE BE running at stock speeds.
previously had the screen flickering problem, so I flashed my BIOS and things were alright for awhile.
Recently the screen flickering has returned, and I am experiencing artifacts during gaming sporadically.
Temperatures during load hovers around 64 degree Celcius.
I have tried bumping up fan speeds to 60-70% to no avail.
Could it be a BIOS/Driver problem, or is the graphics card overheating?
Any suggested solutions?
Thanks a lot in advance!
have a msi r7970 PE BE running at stock speeds.
previously had the screen flickering problem, so I flashed my BIOS and things were alright for awhile.
Recently the screen flickering has returned, and I am experiencing artifacts during gaming sporadically.
Temperatures during load hovers around 64 degree Celcius.
I have tried bumping up fan speeds to 60-70% to no avail.
Could it be a BIOS/Driver problem, or is the graphics card overheating?
Any suggested solutions?
Thanks a lot in advance!

eminus
Supremacy Member
- Joined
- Jul 8, 2011
- Messages
- 6,688
- Reaction score
- 0
hi guys, need some assistance.
have a msi r7970 PE BE running at stock speeds.
previously had the screen flickering problem, so I flashed my BIOS and things were alright for awhile.
Recently the screen flickering has returned, and I am experiencing artifacts during gaming sporadically.
Temperatures during load hovers around 64 degree Celcius.
I have tried bumping up fan speeds to 60-70% to no avail.
Could it be a BIOS/Driver problem, or is the graphics card overheating?
Any suggested solutions?
Thanks a lot in advance!
bro I have same GPU as yours, mine even runs at 75c without issue. I would suggest you do a clean install of the driver. do you have a driver sweeper? try that one to remove residual files and registry in your system.
I have tried 13.2 and 13.4 now without any issue
check the voltage of your GPU Core and RAM and post it here when running and experiencing the flickering
Last edited:
- Joined
- Jul 14, 2005
- Messages
- 37,841
- Reaction score
- 10,088
hi guys, need some assistance.
have a msi r7970 PE BE running at stock speeds.
previously had the screen flickering problem, so I flashed my BIOS and things were alright for awhile.
Recently the screen flickering has returned, and I am experiencing artifacts during gaming sporadically.
Temperatures during load hovers around 64 degree Celcius.
I have tried bumping up fan speeds to 60-70% to no avail.
Could it be a BIOS/Driver problem, or is the graphics card overheating?
Any suggested solutions?
Thanks a lot in advance!
what games are u playing when this happens? diablo 3?
it is not a BIOS issue. definitely either driver/game or gpu. did you overclock ur gpu? if so, restore to stock speed and try again
Lemme retype it. Teron bro, if can help me paste it at the front ba. Easier for reference.
Steps for overclocking gpu:
Disclaimer: Please do note that overclocking is done at your own risk. I or corbell will nt cover any severe damage that is inflicted by careless overclocking.
1. Download MSI Afterburner, GPU-Z, 3D Mark 11 and Furmark via the links below:
MSI Afterburner (For overclocking):
MSI Afterburner
GPU-Z (For monitoring of clock speed, vrm temperature and gpu core temperature:
GPU-Z Video card GPU Information Utility
Furmark (Stress testing of GPU core for maximum core temperature):
FurMark: VGA Stress Test, Graphics Card and GPU Stability Test, Burn-in Test, OpenGL Benchmark and GPU Temperature | oZone3D.Net
Benchmark Software such as 3D Mark 11:
3DMark11 for Windows 7
2. After downloading and installing the software, launch MSI Afterburner.
You will see something like the screenshot below:
Core Voltage: Increase the voltage to your GPU if more power is needed for the overclock. This is disabled by default.
PLEASE DO NOT USE THIS IF YOU HAVE NO EXPERIENCE IN OVERCLOCKING AS OVERVOLTING MIGHT DAMAGE THE GPU AND BURN THE CARD!
Core Clock: Increase this to overclock your GPU
Shader Clock: Shader clock is 2 x Core Clock. If you increase the Core clock, the shader clock will increase accordingly.
Memory Clock: Increase this to overclock the memory clock speed which has little influence in the performance of the graphics card
Fan Speed: Allows you to adjust the fan speed (Manual/Auto)
3. For experience overclocker whom wants to unlock voltage control (allows you to adjust Core Voltage in MSI Afterburner), please perform Step Number 3, else skip to step 4.
4. Now, increase core clock by 10-20mhz or more.
5. Launch GPU-Z and make sure that GPU Clock is increased by the speed which you set in step 4.For
e.g. Default clock = 850Mhz. You overclock the GPU by 20Mhz, Hence you should see 870Mhz at GPU Clock.
6. After doing so, test for stability of the card by playing games (if you dont want to waste time to sit down and watch the benchmark) or run 3D Mark 11.
a. During this process, if your GPU suffers from artifacts or you start seeing funny coloured dots appearing on the screen (refer to screenshot below)
OR
b. Display driver starts crashing:

OR
c. Computer starts to hang
You should then:
Lower the clock speed by 10Mhz and repeat Step 6 again till 6a, 6b and 6c stops happening, then, that will be the maxmimum clock speed which the GPU can sustain under gaming load.
OR
Increase COre Voltage 1 notch at a time till 6a, 6b and 6c stops happening.
7. After that, stop the benchmark and launch Furmark
Go under settings and ensure that the "Extreme burn in" option is ticked.
8. Launch GPU-Z, under the sensor tab, you can monitor the GPU temp and VRM temp
9. Click on "Burn-in Test" to start the furmark and monitor the GPU and VRM temperature for at least 45mins to an hour.
10. As a safe threshold, I will recommend that the GPU temp does not exceed 85 degree celcius and VRM temp does not exceed 90 degree celcius.
11. If temperature and overclock is stable, you can push the card performance further by repeating step 4-9 again.
SIDE NOTE:
If you intend to run @ OC speeds,
never run @ max OC speeds.
Always drop by 30-50Mhz from your max OC stable speeds to give some buffer allowance
in case of any voltage spikes/drops.
Thank for the detailed explanation!! will try it when i have the time...thank again!
Demonbecks
Senior Member
- Joined
- Feb 24, 2004
- Messages
- 1,362
- Reaction score
- 3
bro I have same GPU as yours, mine even runs at 75c without issue. I would suggest you do a clean install of the driver. do you have a driver sweeper? try that one to remove residual files and registry in your system.
I have tried 13.2 and 13.4 now without any issue
check the voltage of your GPU Core and RAM and post it here when running and experiencing the flickering
just did a clean install and installed 13.4.
will try out if there are any issues thanks!
Demonbecks
Senior Member
- Joined
- Feb 24, 2004
- Messages
- 1,362
- Reaction score
- 3
what games are u playing when this happens? diablo 3?
it is not a BIOS issue. definitely either driver/game or gpu. did you overclock ur gpu? if so, restore to stock speed and try again
played bioshock infinite and dota 2 and artifacts appear, already on stock speed.
- Joined
- Jul 14, 2005
- Messages
- 37,841
- Reaction score
- 10,088
played bioshock infinite and dota 2 and artifacts appear, already on stock speed.
reinstall graphics card driver. Try running furmark and 3dmark after that. Monitor the temperature after furmark for 45mins.
If problem still occurs, bring it to corbell for a check. They will rma e card if found faulty


Important Forum Advisory Note
This forum is moderated by volunteer moderators who will react only to members' feedback on posts. Moderators are not employees or representatives of HWZ Forums. Forum members and moderators are responsible for their own posts.
Please refer to our Community Guidelines and Standards and Terms and Conditions for more information.
