~~Deepcool Tesseract PC casing review~~

tamjinhang

Senior Member
Joined
Nov 14, 2010
Messages
548
Reaction score
0
DeepCool Tesseract Review

black_zps4864446c_1_.png


Specs:
Matrix_en_06.jpg

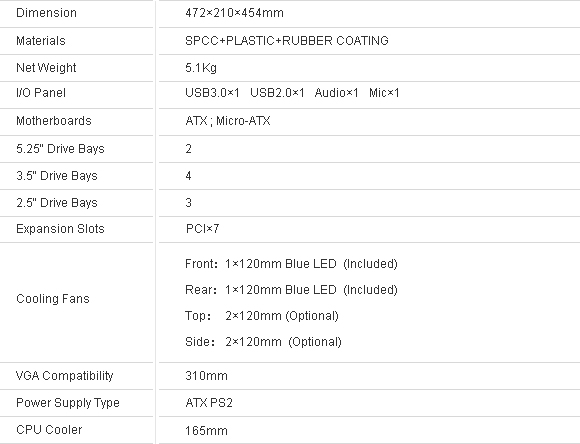
(taken from Deepcool Global website)

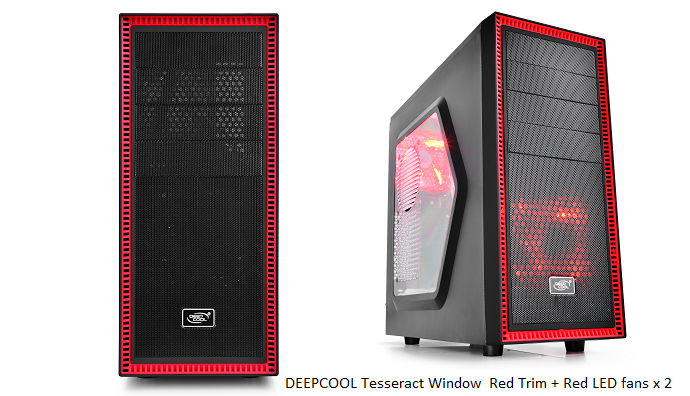
Finally a chance to review a PC casing! I only heard and saw CPU heatsinks and fans from DeepCool so far, so it was a surprise to hear that they make casings as well! Let’s take a look and see if it stands up to the competition.


The outer box is made of cardboard. This is normal given it’s meant to be a budget casing. There’s a lot of details and features written on the box though, which is a plus to attract buyers given the lack of colour on the cardboard. Contents are of the usual: casing, manual, screws, cable ties and motherboard speaker.
 

tamjinhang

Senior Member
Joined
Nov 14, 2010
Messages
548
Reaction score
0
Physical look


The version reviewed here comes with the windowed side panel; the other version just has a metal side panel with 2 fan slots, sold in black or red with blue front rim. For the windowed version, the case comes in more than just black or white though. Locally, there’s the black version, though there’s no white AFAIK. The black case comes with 3 front rim colour choices: red, blue or the same black. More importantly, the colour we’re talking about here is present only at the front of the case. Here’s a picture of the red version just to show you:

red_zps35ed3fad.png


So yeah, it’s at the outer edge of the front panel. I find it quite good because of how it does not interfere with the overall look of the case. For this review though, it’s basically going to be black throughout the front panel. Is it dull? Well, all-black gives it a rather stealth feeling to the case. Whether it’s good or bad depends on the individual. Another thing to note is that the outer rim is made of rubber! They were very likely going for different material and touch. The holes in the outer rim aren't just for aesthetics either: they’re air vents for front air intake!


At the top of the case, we can see mounts for two 120mm fans, as well as the front I/O. You may have noticed the colour difference between the front I/O area and the rest of the top panel; that’s because the front I/O area has rubber as well! The top panel looks good and all, except that I wished there were one or two more front panel USB ports to use…


The back of the case is more or less standardized: one mount for a 120mm blue LED fan that’s included, two holes for watercooling hoses, 7 expansion slots (wished there were removable slot panels though) and also a standard ATX PSU mount.


The bottom of the case consists of the 4 simple plastic feet that the casing stands on and also a mesh filter for the PSU. It’s a great addition to have since it’s now easier to keep dust out of the PSU.


The right side panel is strangely not just a plain sheet of black metal. Over here, there’s an arrow-shaped compartment that’s protruding out. The reason for this design will be shown later…
 
Last edited:

tamjinhang

Senior Member
Joined
Nov 14, 2010
Messages
548
Reaction score
0


The left side panel contains your acrylic window panel in that same arrow-shape…. and two 120mm fan mounts. This was something that puzzled me greatly. Usually, the purpose of having a window panel would be to allow one to display the internals of the PC, but it’s hard to do so here. The fan grills and holes interfere with the look of the window panel. In addition, mounting fans would sort of defeat the purpose of having a window panel. If you’re looking to mount fans on the side panel, the Tesseract standard panel version would be more suitable. There’s also a few lines in the acrylic panel itself:


They seem to be within the panel and of a regular pattern. Only noticeable under bright light, but it will stick out greatly for those who can notice it. I feel that a plain acrylic panel is more suitable for this casing.
 
Last edited:

tamjinhang

Senior Member
Joined
Nov 14, 2010
Messages
548
Reaction score
0
Internals

Let’s have a look at the internals of the casing.


The inside of the casing is all painted black, which is very good news because it allows us to implement nearly all kinds of colour schemes for a PC build. Looks pleasant to the eye too as compared to unpainted silver aluminium ><


There’s 3 mounting brackets available for 2.5” drives and 4 available for 3.5” drives, along with 3 clip-based brackets for 5.25” items. These are great tool-less features to have for a PC casing due to convenience and ease. The ones available in the Tesseract are made of amazingly sturdy plastic and hardly show any flex. The 2.5” bracket will need 4 screws to secure the 2.5” drive to the bracket while the 3.5” bracket will not need any, but both kinds of brackets will slot firmly into the casing without the need for screws. Only con spotted here is the inability to remove the 2.5" and 3.5" drive cages, thought it's not a major issue due to its wide graphics card length support of 310mm.


tamjinhang

Senior Member
Joined
Nov 14, 2010
Messages
548
Reaction score
0
The blue LED fans here are transparent and have silver wires for a change. Good riddance to those yucky red-black-yellow wires we commonly see, but why does it have a 4-pin molex wire in addition to the 3-pin wire together? It would be much easier to manage the wire if there’s only the 3-pin fan header and if an extension of direct power is needed, it can be provided as an extension cable.


The front I/O wires are also the same as those seen in standard casings: one each for power light +/-, HDD light, power and reset buttons, front audio/mic and front USB2.0 + 3.0. The wires are also considerably long, so there’s no issues (in terms of length) with connecting them to any motherboard.


The motherboard tray area is impressive given the price range, to say the least. There’s ample amounts of side wiring holes for cable management, even some catered to micro-ATX motherboards. Well done! However, there’s just one issue with this layout: there’s a missing wiring hole for the 4/8-pin CPU power cable! Hopefully some 8-pin cable cutout will be there in its subsequent cases next time. For now, I’ll see if there’s any way to overcome this issue when I attempt a build on it later.


The back of the motherboard tray shows an enormous hole at the CPU area that allows easy removal of any CPU heatsink backplates of any CPU cooler you may be using. Here you can also see the lack of space behind the motherboard tray, hence the protruding area in the right side panel. This works too, but I would have preferred a larger space behind the motherboard tray if possible.


Last but not least, the inside of the front panel. There’s a mount for a 120mm fan that’s also included and nothing else. The panel itself has one issue I noticed though. Due to the way the front I/O circuit board is mounted, part of the top area of the panel is blocked. Also, what looks like the top 5.25” panel that’s being blocked is not a panel at all; it’s actually non-removable. Yet there is still a clip mount for the unusable slot. The most bottom removable panel can’t fit a 5.25” item too, making it redundant. Hopefully this design flaw can be fixed. In any case, given the sleek front look of the casing, I would suggest not using any 5.25” item in the casing so as not to ruin the look (usually DVD writer).
 

tamjinhang

Senior Member
Joined
Nov 14, 2010
Messages
548
Reaction score
0


For this demo rig, I chose a overall blue theme since the fans in the casing all have blue LED. This will make the overall colour scheme very easy to achieve much more pleasing to the eye.

Mobo: Asus F2A85M-PRO
CPU: AMD A10-6800K APU
RAM: 2 x 4GB Gskill Ares 2133Mhz CL9
PSU: FSP Aurum 92+ 80+ Platinum Modular PSU
SSD: Adata 64GB SATAIII SSD

In this rig, you'll quickly notice that everything blends in well overall in terms of colour: blue parts on the motherboard, blue CPU fan and blue RAM heatsinks together is an absolute killer! No to mention the totally matte black case colour. It certainly was a surprise to find that even the motherboard standoffs were black as well instead of the usual gold / bronze!

It's also relatively easy to route wires behind the back of the case given the space and cable tie holes, though at the very end it was slightly hard to close back the back side panel. This is due to the usually massive 24-pin power connector.

Once the rig is powered on, it roars on with blazing blue fury! The fan lights glow so brightly that it's very uncomfortable looking at them. Perhaps fan lighting could be slightly reduced. Also, the blue light blends in nicely with the blue components within the rig. Only letdown would be how one would not be able to see this beautiful combination much after placing back the side window panel. A full window would be so much better.

--------------------------------

Conclusion

Given the features it has at the $6X price range, I'll say this casing is has high value/$.
Score: 8 / 10

Only real notable cons are lack of 8-pin cutout, fan mounts on window side panel and 4-pin molex connections for fans, though most of these can be easily remedied. This casing is worth considering if u're doing a budget atx build, even for gamers.
 
Last edited:

wtfh4x

Master Member
Joined
Apr 18, 2010
Messages
3,319
Reaction score
209
I'm afraid the rubber coating will turn sticky and nasty after a while especially in non-aircon room. (similar to certain Razer products). Could you let us know if this happens please? I am very interested.
 

tamjinhang

Senior Member
Joined
Nov 14, 2010
Messages
548
Reaction score
0
I'm afraid the rubber coating will turn sticky and nasty after a while especially in non-aircon room. (similar to certain Razer products). Could you let us know if this happens please? I am very interested.

Not sure yet. Relatively new item that dropped by not too long ago. No signs of wear for now.
 

tamjinhang

Senior Member
Joined
Nov 14, 2010
Messages
548
Reaction score
0
compiling demo rig pics. here's something to show for now:


By default, it's already so blinding! My eyes! :s22:
 

DeenzX

Senior Member
Joined
May 29, 2010
Messages
935
Reaction score
0
I think you forgot to post the most important picture of the entire review. How does it look as a whole?
Meaning all covered up, and a camera angle from the front. Maybe connect to your monitor, keyboard & mouse and take an overall picture.
 
Important Forum Advisory Note
This forum is moderated by volunteer moderators who will react only to members' feedback on posts. Moderators are not employees or representatives of HWZ. Forum members and moderators are responsible for their own posts.

Please refer to our Community Guidelines and Standards, Terms of Service and Member T&Cs for more information.
Top