Home Cooking preferably LCHF Series - share ideas etc

kaypohchee

Arch-Supremacy Member
Joined
Oct 10, 2005
Messages
15,493
Reaction score
600
How to cook the perfect Chinese dumplings

https://www.theguardian.com/lifeandstyle/2015/feb/19/how-to-cook-perfect-chinese-dumplings-recipe

3ad07a38-7ef0-4ae5-b91f-93d9883c445f-2060x1489.jpeg


(Makes about 25)

For the dough
(or use about 25 dumpling wrappers – often marked as “gyoza”)
300g plain flour
180ml warm water

For the filling
225g Chinese cabbage (or savoy, if unavailable)
200g minced pork (not too lean)
1tbsp grated ginger
1tbsp light soy sauce
1tbsp shaoxing wine or dry sherry
1tbsp sesame oil
½ egg, beaten
55g finely chopped Chinese chives – or spring onions, if unavailable (or wild garlic when in season)
A little oil, to cook

For the dipping sauce
2tbsp light soy sauce
2tbsp chinkiang (black rice) vinegar
1tbsp chilli oil
1tsp sugar
1tsp grated ginger

1 To make the dough, sift the flour into a large mixing bowl. Slowly stir in the water, a little at a time, until you have a firm dough (it shouldn’t be wet), then turn out on to a work surface and knead for about five minutes until smooth. Cover with a damp cloth and leave to rest for at least 30 minutes.
2 Meanwhile, finely chop the cabbage. I find this easiest to do in a food processor, as Chinese cabbage has a very large stem. Put in a colander or sieve over the sink or a large bowl, sprinkle liberally with salt (about ¼tsp), and leave to drain for at least 30 minutes.
3 Put the pork in a bowl and stir in the ginger, soy sauce, wine, sesame oil and egg until well combined. Squeeze out the cabbage thoroughly and add to the bowl along with the chopped chives. Mix thoroughly. Heat a little oil in a small frying pan and fry a pinch of the mixture to check the seasoning – add salt if necessary. At this point you can leave the filling to sit if you like.
4 Divide the dough into three, and put two bits back under the cloth. Put the remaining piece on a lightly floured surface. Roll it into a sausage about 2.5cm in diameter then cut this into pieces about 2cm long, rolling the sausage a quarter turn towards you after each cut so the piece are slanted in different ways.
5 Dust the pieces with flour, then squash each flat with your hand. Roll out to about 11cm in diameter and stack between pieces of greaseproof paper.
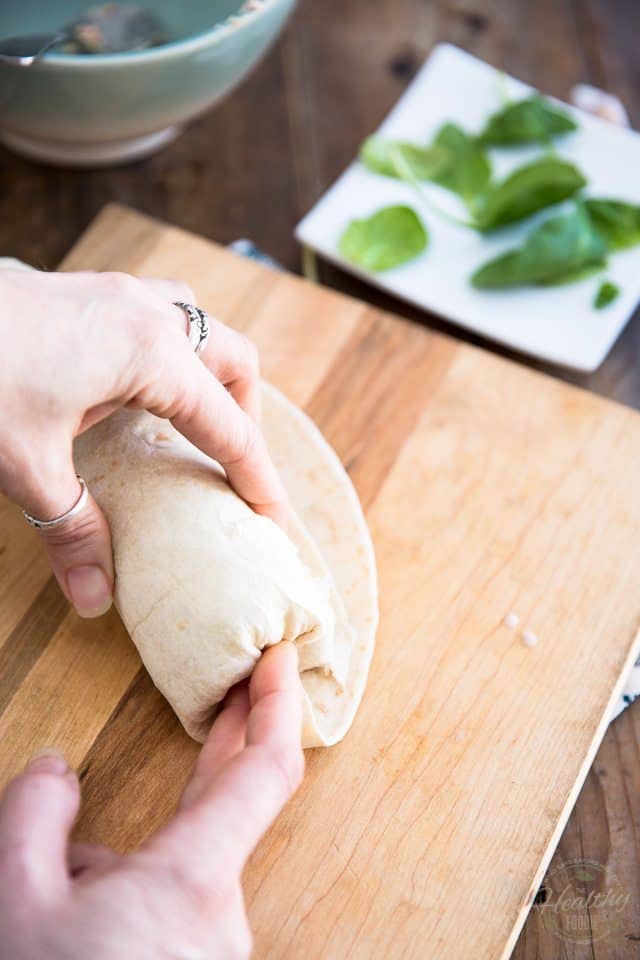
6 To shape, hold one circle in a lightly floured hand and put a heaped teaspoon of filling (avoiding too much liquid) in the middle. Make a pleat at two o’clock, as you look at the dumpling, and then bring the opposite side over to the pleat and pinch the two together. Continue in this way down the length of the dumpling until it is well sealed. Put on a floured tray and repeat with the other dumplings, covering each tray with a damp cloth once it’s finished.
7 Bring a large pan of water to the boil. Add a batch of dumplings (just enough to cover the base of the pan), stir once and leave until they rise to the top. Cook for six minutes more, then lift out with a slotted spoon and either keep warm, or (and preferably) serve immediately. While they’re cooking, whisk together all the ingredients for the dipping sauce.

What did those of you who celebrated on New Year’s Eve eat to bring good luck in the year ahead? And, even if you didn’t, which dumplings, Chinese, Italian – even British – would you recommend to bring culinary joy?


Sheng Jian Bao (Pan-Fried Pork Soup Dumplings) Recipe

http://www.seriouseats.com/recipes/2015/04/sheng-jian-bao-pan-fried-pork-soup-dumplings-recipe.html

20150323-pan-fried-pork-bao-shao-zhong-24-thumb-1500xauto-421201.jpg


Xiao long bao, Shanghai-style soup dumplings, have become legendary for good reason, but so far their doughier pan-fried cousins called sheng jian bao remain much less well-known here in the States. If you love XLB, you need to try sheng jian bao. Here's how to make them, from the flavorful pork filling to the dough wrapper and combo pan-frying and steaming method.

Why this recipe works:
- Rolling the dough to the perfect thickness makes wrappers that are thicker than classic steamed soup dumplings, but thinner than the many overly doughy versions out there.
- A combination of baking powder and yeast in the dough make for a quick process and light texture.
- Searing, then steaming the buns gives a crisp browned bottom while cooking them all the way through.

YIELD: Makes about 24 dumplings
ACTIVE TIME: 30 minutes
TOTAL TIME: 1 hour

Ingredients
For the Pork Filling:

1 cup shredded Napa cabbage (from about 2 or 3 leaves)
1 teaspoon kosher salt
3/4 pound pork belly, cut into 1-inch cubes
2 dried shiitake mushrooms, soaked in boiling water for 1 hour, then drained, squeezed dry, and finely chopped
1 scallion, finely chopped
2 medium cloves garlic, minced
2 teaspoons cornstarch
1 teaspoon Shaoxing wine
1 teaspoon toasted sesame oil
1 teaspoon vegetable, peanut, or canola oil
1/4 teaspoon sugar
1/4 teaspoon ground white pepper
For the Dough:
1 cup plus 6 tablespoons all-purpose flour, plus more for dusting
2 tablespoons cornstarch
1/4 teaspoon kosher salt
1 tablespoon sugar
1 1/2 teaspoon baking powder
1 1/4 teaspoon dry yeast
1/2 cup lowfat or whole milk
Vegetable, peanut, or canola oil, for greasing and cooking

Directions
1. For the Pork Filling: Place Napa cabbage in a bowl, add salt, and mix until slightly wilted, about 1 minute. Let stand at room temperature for 10 minutes. Squeeze cabbage of excess water and return to bowl.

2. Place pork belly in a food processor and process until finely ground. Add Napa cabbage, shiitake mushrooms, scallion, garlic, and pulse 2 times until incorporated. Transfer to a large bowl.

3. Add cornstarch, Shaoxing wine, sesame oil, vegetable oil, table salt, sugar, and white pepper powder to the ground pork. Mix well and set aside in the refrigerator. The filling can be made a day ahead.

4. For the Dough: In a large bowl, mix flour, cornstarch, salt, sugar, baking powder, and yeast together. Warm milk in a microwave, about 30 seconds. Stir half of the milk into the flour, combine with a spatula, then stir in the remaining milk until thoroughly combined. Knead until dough comes together, about 5 to 10 seconds. Transfer dough to a clean work surface and knead until the dough is smooth. Grease a bowl with oil, transfer the dough to the bowl, and cover with plastic wrapper. Let rest for 30 minutes.

5. To Assemble the Buns: Transfer dough to a lightly floured work surface. Cut dough into 4 equal parts. Roll out one portion of dough into a 6-inch snake, and cut into 6 equal pieces. Roll each piece of dough into a ball, flatten it with the palm of your hand, and roll the dough out with a small rolling pin until it is about 3 1/2 inches in diameter.

6. Place about 1 tablespoon of the pork filling in the center of the dough round. Fold the dough up and around the filling, pleating and pinching around the top until sealed.

7. Place finished buns on a lightly greased plate, cover plate loosely with plastic wrap, and let rest at room temperature for 10 minutes. The buns can be frozen at this point by spreading them on a parchment-lined baking sheet dusted with flour and freezing; transfer frozen buns to a zipper-lock bag for long-term freezer storage.

8. To cook fresh buns, heat 1 teaspoon oil in a non-stick skillet over medium-high heat until shimmering. Place the buns in the pan, leaving 1/2 inch of space between each bun (work in batches if necessary). Pan-fry the buns until they start to turn lightly golden brown on the bottom, about 25 seconds. Pour 1/4 cup water into the skillet and cover immediately. Cook until the water completely evaporates, about 5 minutes. Turn off the heat and leave the lid on the pan until the sizzling stops, about 30 seconds. Remove the lid, plate the buns, and serve immediately.

9. To cook frozen buns, heat 1 teaspoon oil in a non-stick skillet over medium-high heat until shimmering. Place the frozen buns in the pan, leaving 1/2 inch of space between each bun (work in batches if necessary). Pan-fry the buns until they start to turn lightly golden brown on the bottom, about 25 seconds. Pour 1/4 cup water into the skillet and cover immediately. Cook until the water completely evaporates, about 7 minutes. Turn off the heat and leave the lid on the pan until the sizzling stops, about 30 seconds. Remove the lid, plate the buns, and serve immediately.


Shanghai Soup Dumplings (Xiao Long Bao)

http://cherryonmysundae.com/2014/05/shanghai-soup-dumplings-xiao-long-bao.html

soup-dumplings-20.jpg


If you ever heard of the restaurant Din Tai Fung, you are familiar with Xiao Long Bao, Shanghai soup dumplings. This famous international restaurant is famous for serving delicate pork dumplings that are filled with a savory broth. You bite into these little wonders and out comes a hot flavorful soup. Pour out the soup first than dip the dumplings into a vinegar and ginger dipping sauce. Drooling yet? Although these dumplings are most popular at Din Tai Fung, they are available at few other Chinese restaurants; no matter what establishment you get them from, they will be delicious, I guarantee it. Determined to replicate Xiao Long Bao myself, I did some research and made my own version at home. The dumpling’s reputation for being tedious and difficult to make was very much true; however, with detailed steps and instructions you can successfully make your own batch at home!

Shanghai soup dumplings (Xiao Long Bao)

Yields 20
Total Time8 hr

Broth
8 oz or so pork skin, a little more or less won’t matter too much
3 big slices of ginger
1 scallion
4-5 pieces country ham bones with meat attached
6 cups water
1 tsp salt

Dough
200 grams flour
3 fl ounces hot water
2 tbsp cold water
1/2 tbsp oil

Filling
6 ounces ground pork
4 ounces shrimp, finely minced
1 stalk green onion, finely minced
2 cloves garlic, grated
2 tsp ginger, grated
2 tsp soy sauce
1 tsp sugar
1 tsp Chinese rice wine
1 tsp sesame oil
1/4 tsp white pepper
1/2 tsp salt

Dipping sauce
1/4 cup black vinegar
1 tbsp ginger, peeled, thinly sliced

Instructions
1 Prepare broth according to recipe, letting it sit in the refrigerator until set.
2 Meanwhile, prepare the dough. Weigh 180 grams flour and place in a medium bowl. Gradually pour the hot water in and stir with a wooden spoon until a dough begins to flour. Add the cold water and oil and stir until well-combined. Dust work counter with remaining flour. Transfer dough to the counter and knead for 8-10 minutes or until smooth and soft. The dough should bounce back when poked. Cover and let sit for 30 minutes.
3 Prepare the filling. Combine all the ingredients from pork - salt. Remove broth from refrigerator and cut into small cubes. Add 1 cup of broth to the filling mixture and stir to combine.
4 Unwrap dough and divide into four portions. Cover three portions as you work with the first piece. Roll out the dough into a 1/2 inch thick rope. Cut the dough into 5 even pieces about the size of a quarter. Roll out each piece into a paper-thin round disc, about 3 inches in diameter. The edges should be thinner than the center of the disc. Place 1 tbsp filling in the center of the disc. Gather up the edges and begin pleating, pinching the tops to seal the dumpling. Repeat with remaining dough, covering finished dumplings until ready to steam.
5 Line steamer with napa cabbage or parchment paper punctured with holes. Heat steamer for 2 minutes over medium heat or until cabbage has softened. 6 Transfer dumplings to hot steamer and cook for 10 minutes. Serve with sliced ginger and black vinegar dipping sauce.

Adapted from Broth recipe from Three Squabbling Asians
http://www.threesquabblingasians.com/yes-you-can-make-shanghai-soup/

**Helpful tips and common mistakes

Okay so I’ll admit, my Shanghai soup dumplings were not perfect. The dough was not as thin as it should have been, but learn from my mistakes and you can make yours come out perfectly!

While researching recipes for these dumplings, I found that almost all used gelatin as the thickener. I doubt that was the traditional way to prepare the broth, so I went with another recipe that used pork skin – all natural! If you cannot find pork skin, purchase pork belly and remove the skin on top.

When preparing the broth, you want the most flavorful soup you can get. Ham and chicken bones are often used to add the savory quality.
xNszmE3.jpg


After the broth cooks for several hours, strain and let chill in the refrigerator. The pork skin adds a natural thickener to the broth and allows it to become like jello!
Kc4xzqU.jpg


Now here come’s the difficult part, the dough. You can always purchase dumpling wrappers but if you went to the trouble of making the soup, why not go all the way?

The secret to the perfect dough is using a combination of hot and cold water. The hot water partially cooks the dough, reacting with the gluten, resulting in a pliable dough. If the dough needs more flour, add 1 tbsp at a time until desired consistency. Knead until the dough is smooth and soft.

While the dough rests, prepare the filling. Cook a small portion of the filling as a flavor-tester, adding more salt and pepper if necessary. You want a balanced flavor of sweet and salty, with the pork and shrimp shining through.

Now back to the dough. To get consistent sizes, weigh the dough into 20 even portions. Each portion will be about the size of a quarter, or even slightly smaller. Continue to dust the counter as you roll out each portion to prevent the dough from sticking. You want the dough to be as thin as you can get it. Even when you think you can’t go thinner, continue rolling it out, trust me.

Start with slightly less than 1 tbsp filling, adding more as you get more comfortable pleating the dumplings.

Pinch the pleated top, gathering the edges to seal to the dumpling.
DSwRUOA.jpg


I made the mistake of not softening the cabbage before placing the dumplings on top. Softening the cabbage makes it much easier to not only place the dumplings on top but from removing them from the cabbage after cooked.
RXqiQG4.jpg


To serve, simply put thinly sliced ginger in a dipping sauce and pour black vinegar on top. Bite into that Shanghai soup dumpling, drink the soup and eat up! After all that hard work, it’s easy to appreciate these dumplings even more.


http://thewoksoflife.com/2014/09/steamed-shanghai-soup-dumplings-xiaolongbao/

shanghai-soup-dumpling-06.jpg


Shanghai Steamed Soup Dumplings (Xiaolongbao)

Prep time 24 hours
Cook time 30 mins
Total time 24 hours 30 mins

Shanghai Soup Dumplings, or xiaolongbao (小笼包)—perhaps the most perfect single bite of food ever conceived by man—does not require much introduction. This tantalizing, dreamy snack is probably the most famous dish to come out of Shanghai: paper-thin skin enveloping perfectly seasoned pork filling and rivers of hot, flavorful soup. If you want to make more of these, you can multiply this recipe as needed! It's not really a good idea to freeze these, as they're so delicate.
Author: Judy

Recipe type: dim sum
Cuisine: Chinese
Serves: 18-20 dumplings

Ingredients
For the aspic:
½ lb pork skin, cut into 1-inch strips
1 lb pork neck bones (you want neck bones that still have meat on them!)
water
2 slices ginger
1 scallion, cut into 3 pieces
1 tablespoon shaoxing wine
For the dough:
1 cup all-purpose flour
6 tablespoons warm water
For the filling:
1 lb ground pork (70% lean 30% fat)
2 tablespoons shaoxing wine
¾ teaspoon salt
½ teaspoon sesame oil
¾ teaspoon sugar
3 teaspoons light soy sauce
3 tablespoons water
A pinch of ground white-pepper
1 tablespoon minced ginger
1 heaping cup of your aspic, diced into ½-inch pieces
To serve:
Chinese black vinegar
julienned ginger

Instructions
Step 1: The Aspic
1 In a small pot, add the pork skin and pork bones and cover with cold water. Bring to a rolling boil, and immediately drain and rinse off the bones and the skin. This gets rid of any impurities. Rinse out the pot and put everything back in. Add 4 cups of water, ginger, scallion and wine. Bring the pot to a boil and then reduce the heat to low. Cover and simmer for 2 hours.
2 After 2 hours, turn off the heat, allow the soup to cool, and strain the liquid into a bowl. As to the leftovers in the pot, you can discard it or go the Chinese route, which would be to drizzle some light soy sauce over everything and start grazing). Once the liquid is completely cooled, cover and refrigerate overnight.
Step 2: The Dough
3 In a mixing bowl, add the flour and the warm water 1 tablespoon at a time. Work and knead the dough for 15-20 minutes. The dough should be very soft and smooth. Cover with a cloth and let it rest for 30 minutes.
Step 3: The Filling:
4 Take your ground pork and put it in the food processor. Pulse for 30-60 seconds until the pork resembles paste. In a mixing bowl, add the pork and all the rest of the ingredients except the aspic. Whip everything together thoroughly, for about 2 minutes. You want everything to be extremely well combined, and the pork should look like a light, airy paste. Gently fold in the aspic, and do not over-mix. Cover and transfer the filling to the refrigerator until ready to make the dumplings. If you’re ready now, you can put it in the freezer for 15 minutes to allow it to firm up and make assembling the buns easier.
Step 4: Assembly
5 Lightly dust a clean work surface with flour and roll the dough into a long cylinder/cigar, about an inch in diameter. Cut the dough into small equal pieces weighing about 11 grams each (the dough chunks should be a size resembling that of gnocchi). Roll out each piece into a round disc about 3 - 3 ¼ inches diameter. Keep everything under a damp cloth.
6 Prepare your bamboo steamer. You can line it with cheese cloth, napa cabbage leaves, or these lovely bamboo steamer discs, which can be found in some Chinese restaurant supply stores (if using these, you must brush the discs with oil first!).
7 When all that is prepared, take out the filling. You’ll be making each bun one at a time. Place about 1 tablespoon of filling in the middle of your dumpling skin. Pleat the dumpling as shown in the video. It should have as many folds as you can muster: 12-20 folds should do it. Watch the video in our Carrot Ginger Pork Bun post. The technique is very similar. For this one, you’re just making more folds. Make sure the top is sealed. If the filling ever gets too wet or hard to handle, put it in the freezer for another 15 minutes and start again.
8 Place the buns in the lined steamer basket, about 2 inches apart.
Step 5: Steaming
9 In a metal steamer pot or wok, boil water. If using a wok, put the water at a level so that when you put the bamboo steamer into the wok, the water rises about ½ inch up the bottom of the bamboo base. You never want the water to touch the dumplings inside, though, so make sure not to fill it too high!
10 Once the water is boiling, put the bamboo steamer in the wok or steamer pot, cover with the bamboo steamer lid, and steam over high heat for 8 minutes. Immediately remove the bamboo steamer from the pot and serve.
Step 6: Eating
11 Ok, so there is definitely a proper way to enjoy these dumplings. Put away the soy sauce because it has no place on the table right now. What you want is Chinese black vinegar. Pour some out into a small, round dish or bowl, and top with some very thin matchsticks of ginger.
12 Take out your two utensils—chopsticks and a Chinese soup spoon (a fork would just butcher these and the soup would dribble out all over the table. It would be a tragedy of Shakespearean proportions).
13 Carefully, slowly peel the xiaolongbao off of the steamer basket and dip it into the vinegar. Gently transfer the dumpling to your soupspoon and take a tiny bite out of the skin on the side of the bun to make a little hole. Proceed to slurp the soup out of the bun (Carefully. It’s HOT). Then, with a little more vinegar, finish the whole thing off in one bite.
14 Repeat.


Shanghai Soup with Steamed Pork Dumplings

http://livewellnetwork.com/Food-Rush/recipes/Shanghai-Soup-with-Steamed-Pork-Dumplings/9359219


Servings: 16-20 dumplings Difficulty: Advanced Time: 2 hours
Provided by: Chef Ryan Scott and Din Tai Fung

Ingredients
16 store-bought dumpling wrappers, 2 1/2 to 3 inch size
Chicken or pork broth
Gelatin
6 ounces fatty ground pork
1 scallion, minced
1 small clove of garlic, minced
1 teaspoon sugar
1 teaspoon soy sauce
1 teaspoon toasted sesame oil
1 tablespoon cornstarch
white pepper to taste
Chinese black vinegar
Sliced fresh ginger

Directions
1. To make the soup broth, cook the pork or chicken broth with the gelatin until combined. Boil on low until it is reduced to half, and refrigerate the mixture until firm.
2. To make the dumpling filling, combine the pork, scallion, garlic, sugar, soy sauce, sesame oil, cornstarch, and white pepper and mix well. Transfer to a food processor and pulse until it is a fine paste.
3. To assemble the dumplings, put 1/2 teaspoon of the gelled broth on the wrapper and op with 1 tablespoon meat mixture. Pleat the dumplings and twist at the top.
4. To cook the dumplings, line a bamboo steamer with cabbage leaves or parchment paper. Steam the dumplings for 4 -5 minutes over medium heat.
5. Combine vingegar and ginger to make dipping sauce, and serve hot dumplings with dipping sauce.
 

kaypohchee

Arch-Supremacy Member
Joined
Oct 10, 2005
Messages
15,493
Reaction score
600
Studies prove that Eat Less Move More doesn't work in the long term ...
lower metabolic rate ... body temp falls ...increased hunger ... etc ....vicious cycle instead

Dr. Jason Fung‏
@drjasonfung
24h24 hours ago
More
New YouTube Lecture discussing maintaining weight loss using fasting. One of my favorites


Therapeutic Fasting - Dr Jason Fung

Public Health Collaboration
Published on 5 Nov 2017

In the FED State - food taken in = insulin present
will burn off the food [NOT the stored fat] - "track & switch" is food

In the FASTED State - no food = no insulin (when sleeping)
therefore burning Stored Fat instead of 0 Food taken in
-----> So Intermittent Fasting comes in

1. Energy Expenditure goes up during fasting
Basal Metabolic Rate goes up/maintained - not down !

2. Hunger doesn't continue to build during fasting
The longer you fast, the faster the hunger goes down [faster in women !]


One Myth of Fasting - burning muscle XXX

Advantages of Fasting :
1 Convenient
2 Free - saving money & time
3 Flexible
4 Simple

Can lose about 1/2 pound with each day of fasting ....


Doc

- maybe you can pick up some TIPS from Dr David Unwin
HOW to go about encouraging patients to make their own conscious choice to go Low Carb & to stay on it etc to be healthier solely based on a dietary change (lifestyle) (ie instead of going on medication/drugs) - diabetes remission etc ....
- how to solve the usual PROBLEMS associated with going LC etc ....
the motivation etc ....
- include 'hope n inspirations' etc ...


Four years of low carb primary care: “It’s a lifestyle not a diet” - Dr David Unwin & Dr Jen Unwin

Follow Dr David Unwin @ https://twitter.com/lowcarbGP

Follow Dr Jen Unwin @ https://twitter.com/jen_unwin
 

kaypohchee

Arch-Supremacy Member
Joined
Oct 10, 2005
Messages
15,493
Reaction score
600
In the end Sat today - woke up early to follow mom to the market - to ensure certain stuff/ingredients are bought - want to repeat the Shanghai Dumplings as so yummy & simple probably lunch tomorrow ?

Tonight will be doing that Garlic Butter Asparagus {Mushroom + Tomatoes] Seafood [Clams Scallop Shrimp Flower-Cut Sotong] Pasta item - I have also got 6 sets of Chicken Wings prepped n marinating in Salt + Grated Garlic in the fridge - probably tomorrow night's dinner [need to dig out or buy some flour here for frying ] !

Now back to more Garlic Butter item recipes ....

https://pinchofyum.com/garlic-butter-spaghetti-with-herbs

215231f6ca5d9769fa4435c368d9ffae.jpg


garlic butter spaghetti with herbs
★★★★★
4.9 from 32 reviews
Prep Time: 15 mins Cook Time: 15 mins Yield: 8
PRINT RECIPE
PIN RECIPE
DESCRIPTION

This garlic butter spaghetti with herbs is a simple twist on the traditional. Made with a garlic butter sauce, fresh basil and spinach, and Parmesan cheese.

INGREDIENTS
1 lb. whole wheat spaghetti
6 tablespoons butter + more for serving
8 cloves garlic, minced
1 large bunch basil, chopped
1 large bunch baby spinach, chopped
2 teaspoons salt
1 teaspoon black pepper
Parmigiano Reggiano cheese for topping

INSTRUCTIONS
1 Cook the spaghetti according to package directions.
2 Meanwhile, heat the butter together in a large nonstick skillet over medium low heat. Add the minced garlic and saute for 3-5 minutes, until soft and fragrant. Be careful not to burn or over-brown the garlic because it will taste bitter. Low and slow is the winner here.
3 Chop the spinach and basil (I had about 5 cups total – it reduces quite a bit as it wilts) into small bite-sized pieces and add to the skillet, stirring for just a minute or two to get the greens softened slightly. Season with salt.
4 Add the spaghetti to the skillet (or vice versa depending on pan size) and season with salt and pepper. Toss well to combine and let it all rest for a few minutes to stick together a bit. Serve with an additional pat of butter and/or fresh grated Parmigiano Reggiano cheese.


Shrimp Scampi Pasta with Asparagus (VIDEO Recipe)

https://natashaskitchen.com/2017/03/17/shrimp-scampi-pasta-with-asparagus

Shrimp-Scampi-Pasta-with-Asparagus-4-768x1152.jpg


Shrimp Scampi Pasta with Asparagus

Shrimp Scampi Pasta with Asparagus has a lemon garlic and herb sauce that packs so much fresh and amazing flavor. A 30 minute shrimp scampi pasta recipe!

Prep time: 5 mins Cook time: 23 mins Total time: 28 mins
Author: Natasha of NatashasKitchen.com
Skill Level: Easy
Cost To Make: $18-$20

Ingredients
½ lb spaghetti
1 lb (or 1 bundle) asparagus, rinsed
3 Tbsp butter, divided
3 Tbsp olive oil, divided
4 cloves garlic, minced (about 1½ Tbsp)
1 lb large shrimp, peeled and deveined (16-20 or 21-25 count)
Sea Salt and Pepper
¼ cup fresh lemon juice (from 1 large or 2 small lemons)
⅓ cup fresh parsley, finely chopped
1 Tbsp grated lemon zest
Grated parmesan to serve

Instructions
1 Bring a large pot of water to a boil, add 1 Tbsp salt and 1 Tbsp olive oil and cook pasta according to package instructions until aldente, or desired doneness (meanwhile, continue with recipe). Drain pasta, return to pot and cover to keep warm.
2 Trim asparagus to remove fibrous ends. The fastest way is by snapping off the ends and wherever they snap is where the fibrous part ends. You can also use a vegetable peeler to remove fibrous ends. Cut asparagus into thirds.
3 Place a large, deep pan over medium/high heat and add 1 Tbsp olive oil and 1 Tbsp butter. Add asparagus, season lightly with ¼ tsp salt and ⅛ tsp pepper and cook uncovered for 5 minutes or until crisp tender, stirring occasionally.
Remove from pan.
Shrimp-Scampi-Pasta-with-Asparagus-6-768x576.jpg

4 In the same hot skillet, add 2 Tbsp oil and 2 Tbsp butter. Once the butter is melted, add minced garlic and sautee, stirring frequently for 1 minute. Add shrimp in a single layer and season with 1 tsp salt and ¼ tsp black pepper.
Shrimp-Scampi-Pasta-with-Asparagus-9-768x576.jpg

5 Saute until shrimp are pink and not translucent (about 2 minutes per side). Be careful not to overcook or shrimp will be tough.
Shrimp-Scampi-Pasta-with-Asparagus-10-768x576.jpg

6 Add ¼ cup lemon juice, ⅓ cup chopped parsley, 1 Tbsp lemon zest and stir to combine. Turn off the heat and return pasta and asparagus to the pan. Toss everything to combine and serve with grated parmesan.


Garlic Butter Shrimp Pasta

http://www.delish.com/cooking/recipe-ideas/recipes/a51270/best-garlic-butter-shrimp-pasta-recipe/

1c2f53e3b61d16ffe49f7b84074905ed.jpg


This pasta is truly heaven sent.

TOTAL TIME: 0:25 PREP: 0:25 LEVEL: EASY SERVES: 4

INGREDIENTS
4 tbsp. butter
1 lb. shrimp
kosher salt
Freshly ground black pepper
4 cloves garlic, minced
3/4 c. dry white wine
Juice of 1/2 lemon
pinch of crushed red pepper flakes
3/4 c. grated Parmesan, plus more for garnish
1 tbsp. Freshly Chopped Parsley
12 oz. cooked angel hair

DIRECTIONS
1 In a large skillet over medium heat, melt 1 tablespoon butter. Add shrimp and season with salt and pepper. Cook until pink, 2 minutes per side. Transfer to a plate.
2 In the same skillet, add remaining butter and garlic. Cook until fragrant, 1 minute. Add wine, lemon juice, and crushed red pepper flakes and simmer 2 minutes, then add Parmesan and parsley and let cook 2 minutes more. Add cooked angel hair and shrimp and toss until completely combined. Garnish with Parmesan.


Creamy garlic butter tuscan shrimp coated in a light and creamy sauce filled with garlic, sun dried tomatoes and spinach! packed with incredible flavours!

https://cafedelites.com/creamy-garlic-butter-tuscan-shrimp/

http://www.cucinadeyung.com/2017/06/creamy-garlic-butter-tuscan-shrimp.html

2327fa0504fb2a00d19c0fd4b89cfe9a.jpg


Ingredients
2 tablespoons salted butter
6 cloves garlic, finely diced
1 pound (500 g) shrimp (or prawns) -- tails on or off
1 small yellow onion, diced
½ cup white wine (OPTIONAL)
5 oz (150 g) jarred sun dried tomato strips in oil, drained
1¾ cups half and half (or milk -- reduced fat, skim or full fat milk)* *SEE NOTES
Salt and pepper, to taste
3 cups baby spinach leaves
⅔ cup fresh grated Parmesan cheese (do not include for dairy free option)
1 teaspoon cornstarch (cornflour) mixed with 1 tablespoons of water (optional)***
2 teaspoons dried Italian herbs
1 tablespoon fresh parsley, chopped

Instructions
1 Heat a large skillet over medium-high heat. Melt the butter and add in the garlic and fry until fragrant (about one minute). Add in the shrimp and fry two minutes on each side, until just cooked through and pink. Transfer to a bowl; set aside.
2 Fry the onion in the butter remaining in the skillet. Pour in the white wine (if using), and allow to reduce slightly. Add the sun dried tomatoes and fry for 1-2 minutes to release their flavours.
3 Reduce heat to low-medium heat, add the half and half and bring to a gentle simmer, while stirring occasionally. Season with salt and pepper to your taste.
4 Add in the spinach leaves and allow to wilt in the sauce, and add in the parmesan cheese. Allow sauce to simmer for a further minute until cheese melts through the sauce. (For a thicker sauce, add the milk/cornstarch mixture to the centre of the pan, and continue to simmer while quickly stirring the mixture through until the sauce thickens.)
5 Add the shrimp back into the pan; sprinkle with the herbs and parsley, and stir through.
6 Serve over pasta, rice or steamed veg.

some tips:
If you don’t want to use salted butter, use unsalted and season shrimp to suit your tastebuds.
If wanting to cut the calorie or fat grams, use less butter or cooking oil spray to fry the garlic.
Half and half is an American product, made from equal parts light cream and milk. Feel free to use half light cream and half 2% milk (or full fat if not worried about calories and fat counts), in place of half and half. Alternatively, use all light cream or heavy cream if you wish. For a dairy free option, substitute half and half with almond milk.
I use sun dried tomatoes in oil, and drain them reserving about 1 teaspoon for added flavour when cooking. Feel free to use fat free sun dried tomatoes (not packed in oil), to save calories.
For a gluten free option, find GLUTEN FREE Cornstarch where available


Shrimp, tomato, and spinach pasta in garlic butter sauce


http://juliasalbum.com/2014/10/shrimp-tomato-and-spinach-pasta-in-garlic-butter-sauce/

60eac955184cc23d106bd068a2a0752f.jpg


Shrimp, tomato, and spinach pasta in garlic butter sauce

Prep Time: 30 minutes
Cook Time: 30 minutes
Total Time: 1 hour
Yield: 4 servings

Ingredients
1 pound fresh shrimp, uncooked, shelled and deveined
5 medium tomatoes, fresh, chopped into large cubes
1 cup cooked spinach
5 garlic cloves, minced
3 or 4 tablespoons butter
1 tablespoon olive oil
1/4 small lemon
salt
1/2 teaspoon crushed red pepper (or more)
paprika
10 oz fettuccine pasta
1/2 cup Parmesan cheese, grated, for serving

Instructions
1 Heat a large skillet on medium-high heat, add 1 tablespoon butter and 1 tablespoon olive oil until melted. Add fresh shrimp and half the minced garlic. Make sure shrimp is not crowded. Cook for 1 minute on one side until pink on that side. While it's cooking, generously sprinkle paprika and salt over uncooked side of the shrimp. Flip the shrimp over and cook for another 1 or 2 minutes until pink on the other side.
2 To the skillet with shrimp, add chopped fresh tomatoes, cooked spinach, and remaining amount of minced garlic. Add 1/2 teaspoon crushed red pepper (or more). Mix everything well, remove from heat while you cook pasta.
3 In the mean time cook pasta according to package instructions. Drain and rinse with cold water to prevent pasta from cooking and getting mushy.
4 Add pasta to the skillet with shrimp and vegetables with 1 or 2 tablespoons of butter. Add freshly squeezed lemon juice (depending on the juiciness of your lemon, it could be 1/4 of small lemon or 1/2 lemon). Don't add too much lemon juice. Season with salt and more crushed red pepper. Warm it up on medium heat until shrimp is cooked through, and all ingredients are heated through.
5 To serve, top with grated Parmesan cheese.


Sally Franklin August 26, 2017, 7:44 pm
This was a great dish to make. I appreciated the clear instructions. I added mushrooms and used the fresh spinach instead of cooked, adding new the mushrooms with the other veggies. Thank you, Julia, and commenters for their suggestions.

Carol February 5, 2015, 2:33 pm
Should the tomatoes be seeded as well, or only chopped?


Lori March 5, 2015, 8:07 pm
I seeded them And drained in colander for awhile!


Catherine July 23, 2017, 4:19 pm
I used cherry tomatoes, halved, and had no problem with seeds or too much juice. I had the same thought about using regular tomatoes.

Andrecus February 10, 2015, 7:51 pm
I just made this with colossal shrimp plus cajun crab cakes……it was too good. Everybody smackin. Pure silence and smiles.
 
Last edited:

kaypohchee

Arch-Supremacy Member
Joined
Oct 10, 2005
Messages
15,493
Reaction score
600
BACON SCALLOPS WITH GARLIC BUTTER SAUCE

https://damndelicious.net/2016/02/12/bacon-scallops-with-garlic-butter-sauce/

2710a2c317ac91bf4c1c230fde0e48fc.jpg


BACON SCALLOPS WITH GARLIC BUTTER SAUCE
YIELD: 4 SERVINGS

Crisp bacon, tender-melt-in-your mouth scallops with the most heavenly butter sauce. So fancy yet so easy!

INGREDIENTS:
4 slices bacon, diced
1 pound scallops
Kosher salt and freshly ground black pepper, to taste
1/2 cup unsalted butter
3 cloves garlic, minced
1/2 teaspoon dried oregano
1/2 teaspoon dried basil
1/2 teaspoon crushed red pepper flakes, optional
2 tablespoons chopped fresh parsley leaves


DIRECTIONS:
1. Heat a large skillet over medium high heat. Add bacon and cook until brown and crispy, about 6-8 minutes. Drain excess fat; reserving 1 tablespoon in the skillet. Transfer bacon to a paper towel-lined plate.
2. Remove the small side muscle from the scallops, rinse with cold water and thoroughly pat dry. Season scallops with salt and pepper, to taste. Working in batches, add scallops to the skillet in a single layer and cook, flipping once, until golden brown and translucent in the center, about 1-2 minutes per side. Set aside and keep warm.
3. Melt butter in the skillet. Add garlic, oregano, basil and red pepper flakes; season with salt and pepper, to taste. Cook, stirring frequently, until fragrant, about 1-2 minutes. Stir in bacon and scallops.
4. Serve immediately, garnished with parsley, if desired.

WOODSY — FEBRUARY 17, 2016 @ 1:40 AM REPLY
I made this last night for dinner. I threw in some shrimp and used fresh sea scallops. In one word….outstanding! My wife loved it too. Served them with fresh sautéed red bell peppers, zucchini, and mushrooms. It was definitely, “Damn Delicious!”

NEILL — JUNE 22, 2016 @ 1:10 PM REPLY
I made this dish last night and it was PHENOMENAL!! Very easy to make too, which is important for me:). Thank you for posting this. It will go in my permanent recipe folder! I’ll say a couple things about the recipe. First, I made balsamic mushrooms as a side dish and they went very well with the scallops. Second, next time I make it I’ll probably only do 1/4 cup of butter instead of 1/2 cup. The 1/2 cup seemed a little much when it was all done. Third, next time I’d like to serve the scallops over whipped potatoes. I think the potatoes will help soak up the extra butter and goodness from the sauce. Thanks again for posting this!

KATRINA — JULY 28, 2017 @ 10:34 AM REPLY
Made this last night. It was delicious- love the seasonings. I don’t think it needed 1/2 c butter tho- it was a little heavy along with the bacon. Needs a little citrus or something to cut the fat.
Thanks for the recipe!


https://www.rockrecipes.com/creamy-garlic-scallop-spaghett/

63434346cd8e08209729ed86bc11635e.jpg


Creamy Garlic Scallop Spaghetti with Bacon

Prep Time 15 mins
Cook Time 15 mins
Total Time 30 mins

Creamy Garlic Scallop Spaghetti with Bacon - ready in well under 30 minutes, this in one quick & easy meal that's sure to impress. It easily adapts to serve just two as well, making it an ideal choice for a romantic dinner for Valentine's Day or at any time of the year you want to pamper your sweetheart.
Course: Dinner
Cuisine: Italian Inspired
Servings: 4 Servings
Author: Barry C. Parsons

Ingredients
¾ pound dry spaghetti
4 slices crisp cooked bacon chopped
1 pound medium sized scallops
Salt and pepper to season
3 tablespoons olive oil
6 cloves minced garlic
½ cup white wine
1 cup low sodium seafood stock or chicken stock
1½ cups whipping cream
2 large tomatoes center pulp removed and diced small.
½ cup grated Parmesan cheese

Instructions
1 Cook the dry spaghetti to al dente in salted water and drain.
2 Crisp cook the bacon in a large sauté pan and roughly chop it. Set aside.
3 Season the scallops with salt and pepper and pan sear them in the bacon fat for only about 1½ to 2 minutes per side and set aside with the bacon.
4 Drain the bacon fat from the pan and add the olive oil and garlic; cook for only a minute to slightly soften the garlic.
5 Add the white wine and seafood stock and simmer quickly for a few minutes until the liquid has reduced by about ⅓. Add the cream and simmer for an additional 2 minutes.
6 Season with salt and pepper if needed, then add the bacon, tomatoes and the scallops to the sauce. Simmer for only a minute or two to warm the scallops through before adding the cooked pasta and Parmesan cheese.
7 Toss together the pasta and sauce very well before serving.


EASY LINGUINE WITH CLAMS

https://damndelicious.net/2014/12/20/easy-linguine-clams/

IMG_4874edit.jpg


EASY LINGUINE WITH CLAMS

YIELD: 4 SERVINGS PREP TIME: 5 MINUTES COOK TIME: 15 MINUTES TOTAL TIME: 20 MINUTES

The easiest, budget-friendly pasta you will ever make, and it’ll be on your dinner table in just 15 min. It’s just THAT easy!

INGREDIENTS:
12 ounces linguine
3 tablespoons unsalted butter
3 cloves garlic, minced
Pinch of crushed red pepper flakes, optional
1/2 cup vegetable broth, or more, as needed
Kosher salt and freshly ground black pepper, to taste
2 pounds littleneck clams, cleaned
2 tablespoons chopped fresh parsley leaves

DIRECTIONS:
1 In a large pot of boiling salted water, cook pasta according to package instructions; drain well.
2 Melt butter in a large saucepan over medium high heat. Add garlic and red pepper flakes, and cook, stirring frequently, until fragrant, about 1 minute.
3 Stir in vegetable broth; season with salt and pepper, to taste.
4 Bring to a boil; reduce heat and simmer until reduced by half, about 1-2 minutes. Stir in clams. Cover, with a tight-fitting lid, and cook until the clams have opened, about 5-8 minutes. Discard any unopened clams.
5 Stir in pasta and additional vegetable broth, as needed.
6 Serve immediately, garnished with parsley, if desired.


https://www.rockrecipes.com/sundried-tomato-seafood-linguine/

a483b24dacd732eb716bace79526497e.jpg


Sundried Tomato Seafood Linguine

Prep Time 15 mins
Cook Time 15 mins
Total Time 30 mins

Sun Dried Tomato Seafood Linguine - This easy to prepare pasta dish is very fast to cook as well and can easily be ready in about 20 minutes. That makes it a great choice for a dinner party or even a dinner for two where kitchen time is kept to a minimum.

Course: Seafood
Servings: 4
Author: Barry C. Parsons

Ingredients
1 pound package fresh linguine cooked al dente
3 tbsp olive oil
2 cloves minced garlic
2 dozen shrimp
2 dozen scallops

1 cup diced red pepper
1/4 cup chopped oil packed, sun dried tomatoes
4 oz white wine [veg broth]
2 cups whipping cream
3 tbsp Dijon mustard
3 tbsp chopped fresh tarragon or a fresh herb of your choice, basil, dill, or oregano are all good choices

Salt and pepper to season

Instructions
1 Heat olive oil in a large heavy bottomed frying pan over medium heat. 2 Season the shrimp and scallops with salt and pepper and quickly saute them for a few minutes until almost completely cooked. Remove the seafood from the pan and set aside while you prepare the sauce.
3 Add the garlic to the pan and sauté for only about 30 seconds to soften the it.
4 Add the white wine ans simmer until the volume is reduced by half, then add the cream, dijon mustard, tarragon, salt and pepper. Simmer until sauce thickens enough to coat a metal spoon.
5 Return seafood to to the sauce, add the red pepper and chopped sundried tomato and simmer for an additional 2 - 5 minutes. Serve over cooked linguine. Sprinkle with chopped crisp cooked bacon when serving (optional).


http://www.dishingdelish.com/shrimp-and-scallops-in-creamy-marinara-sauce/

c151bddbecbdb53dee019bca3b7c0fb3.jpg


YIELDS 6-8

SHRIMP AND SCALLOPS IN CREAMY MARINARA SAUCE

Shrimp and scallops are lightly sauteed with herbs, tomatoes, garlic, white wine, and olive oil, then simmered in a savory, creamy marinara sauce for a weeknight dinner that'll make it feel like the weekend. This dish is best when served over pasta or polenta, and goes great with a glass of white wine. You won't believe how quick and easy this fancy-looking Shrimp and Scallops in Creamy Marinara is to make!

10 min Prep Time
20 min Cook Time
30 min Total Time

Ingredients
1 lb shrimp, peeled and deveined
1/2 lb bay scallops
1 pint grape tomatoes, cut in half
1 bunch (about 2 oz) scallions, chopped
2 cloves garlic, minced
1 cup marinara sauce
1/2 cup heavy cream
1/2 cup dry white wine
2-3 tbsp olive oil, extra virgin
1/2 tsp dried basil
1/2 tsp dried oregano


Instructions
1 In a large skillet, heat olive oil and garlic over medium heat.
2 Add shrimp and scallops. Cook for about 2-3 minutes, or until shrimp looks pink, stirring constantly.
3 Remove shrimp and scallops from skillet and set aside.
4 Add scallions, tomatoes, basil, and oregano. Saute until tomatoes soften, about 5 minutes.
5 Pour in white wine and cook for an additional 2 minutes. Add marinara sauce and heavy cream and stir all ingredients together.
6 Stir shrimp and scallops back in. Lightly simmer for an additional 3-4 minutes.
7 Serve over pasta (gluten free if needed) or polenta.

Notes
I bought the shrimp pre-peeled and deveined. Your fish market may do this for you!
You may also want to serve this with some (gluten free!) garlic bread to soak up the sauce!


http://www.eatwell101.com/shrimp-pasta-recipe-with-tomato-and-spinach

344b03b19524db7400c0c9bbf8217f4c.jpg


INGREDIENTS LIST FOR THE TOMATO SPINACH SHRIMP PASTA

Yield: 4 servings

2 tablespoons olive oil
8 oz (220g) medium shrimp, peeled and deveined
1/4 teaspoon red pepper flakes
1 teaspoon smoked paprika or more, to taste
Kosher salt and freshly ground black pepper, to taste
1 teaspoon italian seasoning
4 roma tomatoes, chopped
1/4 cup fresh basil leaves, chopped
6 oz fresh spinach
3 cloves garlic, minced
8 oz (220g) pene or spaghetti
2 tablespoons high quality olive oil, optional

DIRECTIONS
1. Add 2 tablespoons of olive oil to a large skillet, on medium-low heat. Add shrimp, red pepper flakes, paprika, Italian seasoning and salt in the skillet and cook on medium heat until shrimp is grilled cooked through, about 5 minutes. Remove shrimp from the skillet and set aside.
2. In the same skillet, add chopped tomatoes, chopped fresh basil leaves, fresh spinach, and chopped garlic. Cook on medium heat about 3- 5 minutes until spinach wilts just a little and tomatoes release some of their juice. Remove from heat and adjust seasoning, if needed. Cover with a lid and keep off heat.
3. Cook pasta according to package instructions, until al dente. Drain pasta and add to the skillet with the tomatoes and spinach. Reheat on low heat, mix everything well, adjust seasoning with salt and pepper. Remove from heat.
4. Once pasta and veggies are off heat, add grilled shrimp back and drizzle with good quality olive oil just before serving, for an extra taste. Serve the shrimp pasta immediately, enjoy!

Notes: Keep pasta al dente because they will soak up a bit of the sauce. Also don’t overcook shrimp at the beginning, otherwise they will dry up.


SEAFOOD FETTUCINE ALFREDO RECIPE WITH SHRIMP, SCALLOPS, AND MUSHROOMS

https://www.tastyeverafter.com/seafood-fettuccine-alfredo/

93da8051999ba411d151243410701f91.jpg


SEAFOOD FETTUCINE ALFREDO RECIPE WITH SHRIMP, SCALLOPS, AND MUSHROOMS

PREP TIME 10 mins
COOK TIME 15 mins
TOTAL TIME 25 mins

This seafood fettucine alfredo recipe has shrimp, scallops, and mushrooms in a creamy, cheesy sauce that's perfect for family night or a romantic dinner.
Author: Tasty Ever After
Recipe type: Entree
Serves: 4 servings

INGREDIENTS
1 pound uncooked fettuccine noodles
3 Tb unsalted butter, divided
2 Tb olive oil, divided
1 pound large shrimp, peeled and deveined, rinsed and dried well
8 large dry-packed sea scallops, rinsed and dried well
3 green onions, finely chopped
1 medium shallot, finely chopped
4 garlic cloves, minced
8 ounces sliced button mushrooms
½ cup white wine
2 cups heavy cream
½ cup grated fresh Parmesan cheese
salt and white pepper to taste

INSTRUCTIONS
1 Cook fettuccine noodles al dente, according to package directions, drain, and set aside.
2 In a large skillet over medium-high heat, add 1 Tb butter and 1 Tb olive oil. Once butter is melted add shrimp to skillet in single layer and sprinkle with salt and white pepper. Cook until shrimp turns pink on each side and just cooked through, about 3 minutes. Remove, place on plate, and set aside.
3 Add another 1 Tb butter and 1 Tb olive oil to pan, once butter melts, add scallops in a single layer, sprinkle with salt and white pepper, and cook 1½ minutes on each side. Remove and place on plate with shrimp. Set aside.
4 Add remaining 1 Tb butter to pan with green onions, shallots, and garlic, and sauté for 1 minute. Add sliced mushrooms and sauté for 3 minutes. Add white wine, and reduce to half.
5 Reduce heat to medium-low, add cream and stir constantly until slightly thickened, about 2-3 minutes. Stir in Parmesan cheese, taste sauce and add salt and pepper, if needed. Add scallops, shrimp and cooked fettuccine noodles, stir together until everything is well coated and heated through, about 2 minutes.
6 Serve immediately and pass the extra Parmesan cheese!

St. Valentine’s Day is this weekend and here’s a wonderful recipe for seafood fettucine alfredo recipe to make a romantic dinner at home instead of going out. It’s creamy, a little cheesy, and absolutely delicious. This recipe is very adaptable and can easily be adjusted to personal preference.

Use all shrimp or scallops or leave out the seafood all together and substitute with boneless chicken breast or thigh cut into bite-sized pieces. Make it vegetarian by adding broccoli, red bell peppers, and/or asparagus. It’s an easy meal that takes less than 30 minutes to cook, yet looks and tastes like you spent all day laboring in the kitchen.

I’m not going to lie. This is not a low calorie meal. It’s full on fattening, but it’s also totally worth the spurge. The recipe is for 4 people, because I figured some may want to make this meal for a family night dinner. For 2 people, just use half of all the ingredients.
 

kaypohchee

Arch-Supremacy Member
Joined
Oct 10, 2005
Messages
15,493
Reaction score
600
Miscellaneous ...


https://www.wokandskillet.com/parmesan-crusted-chicken/#wprm-recipe-container-4242

30452aa264deeb8e57e7013c7a4bde4a.jpg


Parmesan Crusted Chicken is guaranteed to turn out super-moist and juicy every single time. Takes just minutes to prepare, which makes it perfect for a family weeknight meal yet it is elegant enough for your next romantic evening in.

The mayonnaise topping is not only flavorful, creamy and delicious; it keeps the chicken extremely tender and juicy. Your family and your guests are sure to love this dish. It pairs very well with most side dishes. My favorite side dish to pair Parmesan Crusted Chicken with is Bacon Wrapped Asparagus.

Parmesan Crusted Chicken

Course Main Course
Prep Time 5 minutes
Cook Time 20 minutes
Total Time 25 minutes
Servings 4 people
Calories 250 kcal

Ingredients
4 chicken breast halves
1/2 cup light mayonnaise
1/4 cup Parmesan cheese grated
1/2 cup Panko breadcrumbs divided
1/2 teaspoon garlic powder (plus more for seasoning)
salt and pepper to taste

Instructions
1 Take the chicken breast out of your fridge and allow them to sit on your kitchen counter for about 20 minutes to bring them to room temperature before cooking. This will allow them to cook evenly.
2 Preheat the oven to 450 degrees F.
3 Combine 1/2 cup of light mayonnaise, 1/4 cup grated Parmesan cheese, 1/4 cup panko breadcrumbs (note: set aside another 1/4 cup of panko breadcrumbs for later) and 1/2 a teaspoon of garlic powder in a mixing bowl. Stir well to combine the ingredients.
parmesan-crusted-chicken-13.jpg

4 Place the chicken breast halves on a baking sheet lined with parchment paper. Season with salt, pepper and a dash of garlic powder.
parmesan-crusted-chicken-14.jpg

5 Divide the mayonnaise mixture between the 4 chicken breast halves. Use a spoon [not your fingers !] to spread the mixture evenly over the top of each piece of chicken breast.
parmesan-crusted-chicken-15.jpg

6 Top each chicken breast with the remaining 1/4 cup of Panko breadcrumbs.
parmesan-crusted-chicken-16.jpg

7 Bake for 20 minutes.
8 Allow the chicken to rest for about 10 minutes before serving. Serve with your favourite side dish. Enjoy!


Pasta, Bell Peppers, and Asparagus in a Creamy Sun-Dried Tomato Sauce

http://juliasalbum.com/2015/05/pasta-bell-peppers-and-asparagus-in-a-creamy-sun-dried-tomato-sauce/

17370857955_10bfc1a4a9_c.jpg


Ingredients
4 cloves of garlic, minced
1 small jar (3-4 oz) sun-dried tomatoes in oil, or use 3-4 oz fat-free sun dried tomatoes
2 tablespoons oil from the sun-dried tomatoes jar (or vegetable oil)
7-10 sprigs of asparagus
1 red bell pepper, cleaned and thinly sliced
1 yellow bell pepper, cleaned and thinly sliced
8 oz penne pasta (for gluten free, use Tinkyada gluten free brown rice pasta)
1 cup half and half
1 cup grated Parmesan cheese
1 tablespoon basil (if using dry basil), if using fresh basil you can add more
1/4 teaspoon crushed red pepper flakes (at least, add more to taste)
1/2 cup reserved cooked pasta water (or more)
salt, to taste

Instructions
Note: if using sun-dried tomatoes in oil (in a jar), make sure to drain sun-dried tomatoes from oil, before using them. Reserve 2 tablespoons of this drained oil for sauteing as described below:
1 In a large pan, on high heat, sautee garlic and sun-dried tomatoes (drained from oil) in 2 tablespoons of oil (reserved from the sun-dried tomatoes jar - see note above) for 1 minute until garlic is fragrant. Add the rest of vegetables (asparagus, each sprig cut into 3 slices, and thinly sliced bell peppers), sprinkle with a small amount of salt, and cook on medium heat for 2-3 minutes until they soften just a little (you still want them to have a bit of crunch).
2 Bring a large pan with water to boil and cook pasta according to package instructions. Reserve some cooked pasta water. Drain and rinse the pasta with cold water (to stop cooking).
3 Add half and half to the skillet with vegetables and bring to a gentle boil.
4 Then, add grated Parmesan cheese, mix it with half and half as it is boiling for only 30 seconds until it melts, then reduce heat immediately. Simmer and cook, constantly stirring, until all cheese melts and creamy sauce forms. If the sauce is too thick - don't worry - you'll be adding some cooked pasta water soon. Add 1 tablespoon of basil, and at least 1/4 teaspoon of red pepper flakes. Stir to combine.
5 Add cooked pasta to the skillet with the creamy sauce, and stir to combine.
Add about 1/2 cup reserved cooked pasta water because the creamy sauce will be too thick (do not add all water at once - you might need less or more of it). This will water down the thickness of the cheese sauce and make it creamier. Immediately, season the pasta with salt and more red pepper flakes, to taste, if needed. Let it simmer for a couple of minutes for flavors to combine.
Note: Make sure to salt the dish just enough to bring out of the flavors of basil and sun-dried tomatoes.
 

kaypohchee

Arch-Supremacy Member
Joined
Oct 10, 2005
Messages
15,493
Reaction score
600
See for yummy Sat Dinner http://forums.hardwarezone.com.sg/111476025-post1.html

Copied over for convenience

Shiok Dinner with the focus on Garlic Butter

- really yummy dinner of Sweet Garlic Butter Steamed Prawns + Seafood = Clam Scallop Shrimp Sotong - Asparagus Mushroom Tomatoes with Spinach Tagliatelle in lots of Garlic Butter Sauce
JzSQvczl.jpg

rVhuVljl.jpg

zeItrd6l.jpg

sl08rBTl.jpg

yx6zUG2l.jpg

TkJ4mMNl.jpg

R2QO4Ybl.jpg

ZTwWIvDl.jpg


One of our better DIY Seafood Pasta Meals with very sweet steamed prawns done with garlic n butter !
 
Last edited:

kaypohchee

Arch-Supremacy Member
Joined
Oct 10, 2005
Messages
15,493
Reaction score
600
Sat Meals

Tarpaued 3 Siew Mai for my breakfast n had my morning tea after the marketing trip
(Mom had her usual morning bread n spread breakfast at home earlier)
SVvK2EIl.jpg


Mom cooked porridge n served what SHE called "lazy-women" Luncheon Meat - I took out my Pickled Cabbage from the bottle in the fridge a had some to go with the porridge .....
tZRKcb3l.jpg


Another sweet durian Kueh for tea
Somehow mom says quite difficult to buy my requested savoury items instead as she says - can't keep on buying Chinese carrot cake n jee kuey all the time etc ...
aeNdryDl.jpg


Yummy Seafood Dinner
Must do more Steamed Prawn items as so natural sweet - just love the Garlic Butter Steamed Prawns tonight !!!
So simple to do too !
uywl9gll.jpg


Already completed using up that whole pack of Shanghai Dumpling Skins n still got excess filling left .... probably do some pork chive patties there !
Can look forward to a scrumptious Sunday lunch with these juicy dumplings which contain crunchy water chestnuts too as per mom's suggestion !
GKBjPbhl.jpg

c4xTTOcl.jpg


My 2nd attempt at Garlic Chicken Wings marinating overnight for Sunday Dinner !

Sent from Asus ASUS_Z011D using GAGT
 

kaypohchee

Arch-Supremacy Member
Joined
Oct 10, 2005
Messages
15,493
Reaction score
600
http://www.valyastasteofhome.com/turkey-pinwheels-appetizers/

3e69d8baf7a7228d28a8701e5adde69b.jpg


TURKEY PINWHEELS

PREP TIME 20 mins
TOTAL TIME 20 mins

Author: Valya's Taste of Home
Recipe type: Snack
Serves: 28 pinwheels

INGREDIENTS
8 leafs - green leaf lettuce
1 extra large - tomato
1 pack - Flatout flatbread
8 oz. - sliced turkey breast
4 tbs. - mayonnaise
6 slices - american cheese
008-1024x753.jpg


INSTRUCTIONS
1 Lay the flatbread flat on a big cutting board and spread 1 tbsp of mayonnaise on one side.
017-1024x607.jpg

2 Place 2 ½ slices of cheese.
010-1024x576.jpg

3 Lay folded in half turkey breast on top of the cheese.
011-1024x576.jpg

4 Wash green leaf lettuce and pat dry with paper towel. Place it on top of the turkey breast.
012-1024x576.jpg

5 Then put three slices of tomatoes on top of the lettuce.
018-1024x714-1.jpg

6 Tightly roll flatbread length-wise.
7 Cut with a knife into 1 inch pinwheels
Enjoy!
1-1024x880.jpg
 

yonglimm

Arch-Supremacy Member
Joined
May 13, 2012
Messages
18,121
Reaction score
2,024
#kaypohchee_FakeLC said:
The BASIC Solution to getting Good Health etc here
No one answer works for all tho' the very basic is NO CRAP

#kaypohchee_FakeLC said:
To ME - Low Carb IS one Clear Solution [THE main one I'd say but granted maybe not the Only one]


#kaypohchee_FakeLC said:
Ya - need to keep the Carbs lower with LESS Refined Carby Sugars Starches Flours etc but seems my current levels are STILL OK for my HbA1C :D

#kaypohchee_FakeLC said:

Luncheon meat is not crap? :s8: :s13:

#kaypohchee_FakeLC said:
Another sweet durian Kueh for tea
aeNdryDl.jpg

white rice, durian kueh, tea are low carb? or issit another cheat meal day?.... :s8: :s13:

dats why i call u a FAKE LOW CARBER....
:s8:
 

kaypohchee

Arch-Supremacy Member
Joined
Oct 10, 2005
Messages
15,493
Reaction score
600
Revisiting some recipes ...


http://nutritionexpert.com/blog/2016/03/skinny-tuna-avocado-wrap/
a46a7147de7215935f3b542a05a06e91.jpg


Skinny Tuna Avocado Wrap

Serving Size: 1

Ingredients
1 can of tuna, drained
1 Flatout 100% Whole Wheat Flatbread
1 celery stalk, chopped
1/4 avocado
1/4 onion, chopped
3 tablespoons light mayo
1/2 cup baby spinach

Stir together the first 6 ingredients. Line your flatbread with baby spinach and then add tuna mixture into flatbread. Roll, cut in half


https://thehealthyfoodie.com/tuna-wrap/

4e68966cb5844c57358332d86becaaba.jpg


Combine the canned tuna (or cooked chicken), yogurt, Dijon mustard, chopped walnuts, raisins, capers (or green olives), parsley, salt, pepper and red pepper flakes (if using) in a mixing bowl.

TUNA WRAP

Serves: 1 wrap

INGREDIENTS
1 large (10") soft flour tortilla
1 can (142g | 5oz) chunk light tuna fish, in water, drained
¼ cup (60g | 2oz) plain Greek yogurt
1 tsp Dijon mustard
2 tbsp chopped walnuts
2 tbsp raisins (golden or california raisins)
1 tbsp capers
1 tbsp chopped flat parsley
pinch Himalayan salt
pinch freshly ground black pepper
pinch red pepper flakes, optional
a handful (about ½ cup) of baby spinach leaves (or other leafy greens)

INSTRUCTIONS
1 Combine the tuna, yogurt, Dijon mustard, chopped walnuts, raisins, capers, parsley, salt, pepper and red pepper flakes (if using) in a mixing bowl.
2 Mix with a fork until evenly combined.
3 Place the handful of spinach leaves in the center of the flour tortilla, then dump the tuna fish salad right on top of the spinach.
4 Fold the tortilla over the salad and then push gently but firmly with your hand to form a roll.
Tuna-Wrap-15.jpg

5 Tuck the ends in and then finish rolling the tortilla into a tight wrap.
6 Slice on a diagonal and serve immediately, or wrap tightly in plastic film and consume within a day.


https://www.thechunkychef.com/classic-tuna-salad/

fa7c2d1b85c37d96ab416e6025ca22e5.jpg

Classic-Tuna-Salad-9.jpg

Classic-Tuna-Salad-2.jpg


CLASSIC TUNA SALAD

PREP TIME: 5 MINUTES TOTAL TIME: 5 MINUTES SERVINGS: 3 -4 SERVINGS AUTHOR: THE CHUNKY CHEF

A fresh and light classic tuna salad recipe that is as versatile as it is delicious! Perfect in a sandwich, wrap, salad or as an appetizer!

INGREDIENTS
2 oz cans Chicken of the Sea® Solid White Albacore in Water in EZ-Open Cans drained, 5
1/4 cup mayonnaise
2 Tbsp celery minced
2 Tbsp red onion minced
1/2 Tbsp whole-grain mustard or Dijon
1 tsp minced flat-leaf parsley
1-2 tsp sweet pickle relish optional
Salt and pepper to taste
Freshly squeezed lemon juice optional

INSTRUCTIONS
1Fill a small bowl with cold water, add minced red onion and let soak for 5 minutes.
2 Drain and let dry on paper towels.
3 Add tuna to a medium mixing bowl, break up lightly with a fork, then add remaining ingredients (up to salt and pepper).
3 Stir to combine well.
4 Season with salt, pepper, and lemon juice to taste.
5 Serve in a wrap, in a sandwich, on mini toasts, on cucumber slices, in lettuce cups or in a salad.
RECIPE NOTES
1. To serve as a wrap, line a soft flour tortilla with baby spinach, sprinkle with sliced carrots and avocado slices. Scoop tuna salad in a line down the middle of the tortilla, roll up tightly and serve.


3b12e1b1b5019a7662c9db2ea339513b.jpg


ccc33e02fbe176a98ec63a63db6b8504.jpg
 

kaypohchee

Arch-Supremacy Member
Joined
Oct 10, 2005
Messages
15,493
Reaction score
600
https://www.flavourandsavour.com/pomegranate-mandarin-salad-avocado-feta/

f3fdaa654301d06bb180169e5da9026f.jpg


Pomegranate Mandarin Salad with Avocado and Feta

Prep Time 20 mins
Total Time 20 mins

This Pomegranate Mandarin Salad with Avocado and Feta is a festive salad for any winter meal! It's bursting with fruit rich in Vitamin C, crunchy pecans and creamy avocado. Top it with crumbled feta or goat cheese.

Course: Salads
Cuisine: Canadian, American
Servings: 4
Author: Flavour & Savour

Ingredients
1 head romaine lettuce or crisp mixed greens
1 long English cucumber, thinly sliced
1 avocado, peeled, pitted and sliced
2 mandarin oranges, peeled and sectioned
1/2 cup pomegranate arils
1/2 cup crumbled feta cheese
1/2 cup toasted pecans

Citrus Vinaigrette
1/2 cup extra-virgin olive oil
3 Tablespoons freshly squeezed lemon juice
2 Tablespoons white wine vinegar or Champagne vinegar
1 small shallot, finely minced
1 teaspoon Dijon mustard
1 teaspoon honey
1/2 teaspoon each, sea salt and pepper

Instructions
1 To make a wreath-shaped salad, place a small bowl for the vinaigrette in the centre of a larger round shallow bowl or platter.
2 Arrange bite-sized pieces of romaine or other greens in the bowl around the small dish. Top with remaining ingredients, finishing with feta cheese and pecans.
3 Whisk vinaigrette ingredients together and pour into the small bowl in the center of the serving bowl.
4 Serve and drizzle vinaigrette over all just before serving.

Recipe Notes
If you're not serving this salad right away, add the avocado just before serving to prevent browning.


http://foodfolksandfun.net/corn-salad/

9ffe53f8c19cc8896673ecb4308c8c9e.jpg


CONFETTI CORN SALAD

Author: Jillian - a Food, Folks and Fun original!
Recipe type: side dish
Prep time: 1 hour 10 mins
Total time: 1 hour 10 mins

This Confetti Corn Salad is a refreshing, light side dish that’s perfect for summer dinners, potlucks, parties, and more!

INGREDIENTS
2 cups frozen corn kernels
1 pint cherry tomatoes, halved
1 large avocado, diced
1 small orange bell pepper, diced
1 cup peeled and diced jicama
½ cup small diced red onion

DRESSING:
2 Tablespoons extra virgin olive oil
1 small lime, juiced and zested
2 teaspoons honey
¼ cup chopped fresh cilantro
¼ teaspoon salt
¼ teaspoon pepper

INSTRUCTIONS
In large bowl combine corn, tomatoes, avocado, bell pepper, jicama, and red onion.
FOR DRESSING: In small bowl whisk together oil, lime juice and zest, honey, cilantro, salt, and pepper until blended.
TO FINISH: Pour dressing over vegetables and toss gently to coat. Cover bowl plastic wrap and chill 1-2 hours before serving.


https://www.chelseasmessyapron.com/candied-pecan-pear-pomegranate-salad/

bc118e668cf4d2a12ca2d1e526f898d4.jpg


Candied Pecan, Pear, & Pomegranate Salad

Prep Time 20 mins
Cook Time 45 mins
Total Time 1 hrs 5 mins

Ingredients

Candied Pecans
1 large egg white
2 teaspoons water
1 teaspoon vanilla
1 cup white sugar
3/4 teaspoon salt
1 teaspoon cinnamon
4 cups (1 pound) pecan halves

Salad
1 bag (6-8 ounces or about 8 cups) fresh spring mix
1 cup heaping pomegranate arils
3/4 cup dried cranberries
1 can (15 ounces) pear halves*
4 ounces feta cheese

Dressing
3 tablespoons red wine vinegar
5 tablespoons white sugar
1/2 teaspoon salt
1/2 teaspoon dijon mustard do not use regular
1/2 cup frozen raspberries completely thawed
1/2 cup vegetable oil canola or olive oil will work
1 and 1/2 teaspoons poppy seeds

Instructions
For the candied pecans
Preheat oven to 250 degrees F and line a baking sheet with parchment paper.
In a mixing bowl, whip together the egg white, water, and vanilla until frothy. In a separate bowl, mix together sugar, salt, and cinnamon.
Add pecans to egg whites, stir to coat the nuts evenly. Remove the nuts, and toss them in the sugar mixture until coated. Spread the nuts out on the prepared baking sheet.
Bake for 45 minutes to 1 hour, stirring and tossing every 15 minutes.

For the salad:
Thoroughly drain the pear halves and set on a cutting board. Very thinly slice the pears.
Toss together the spring mix, pomegranate arils, dried cranberries, pears, and feta cheese.
Toss to combine.

For the dressing:
Combine all of the ingredients except for the oil and poppyseeds in a blender or food processor. Pulse until the ingredients are well combined. Slowly add in the oil in a steady stream. Blend until emulsified and smooth.
Stir in the poppyseeds. This dressing is supposed to be pretty thick -- when you toss it with the salad it does thin out a little with the juices from the salad ingredients.
Toss the dressing and candied pecans with the salad. Only dress and add pecans to what you will eat because leftovers don't do so well! You can store the salad, pecans, and dressing separately for delicious leftovers!

Recipe Notes
*I use canned pears because of the texture (soft!) and sweetness to them. Feel free to substitute fresh pears if desired.
The amounts of toppings are general guidelines -- we like a lot of toppings to the amount of lettuce.


https://www.cookingclassy.com/pear-spinach-salad-cranberry-orange-vinaigrette/

4b358f2eb7dbe7835bdb0966369c6d42.jpg


Pear Spinach Salad with Cranberry Orange Vinaigrette

Yield: About 4 servings

Ingredients
Vinaigrette
1/2 cup olive oil
1/3 cup (34g) fresh cranberries
1/2 - 1 tsp orange zest
2 Tbsp fresh orange juice
1 Tbsp honey
1 Tbsp granulated sugar
2 tsp dijon mustard
1/2 tsp salt

Salad

5 oz baby spinach
2 Bartlett pears (semi-firm but ripe), cored and sliced
3/4 cup pomegranate arils (1/2 cup dried cranberries would also be good)
3/4 cup chopped pecans
1/3 cup crumbled goat cheese (optional)

Instructions
For the dressing:
Add all of the vinaigrette ingredients to a food processor (beginning with 1/2 tsp zest and adding more to taste as you go). Pulse until cranberries have been pureed into dressing. Transfer to a jar, cover and chill until ready to use.

For the salad:
Layer salad ingredients into a bowl. Drizzle desired amount of dressing over top (you'll likely have some left over) or top each individual serving with dressing. Serve immediately.


https://www.spendwithpennies.com/cranberry-waldorf-salad/

Cranberry-Waldorf-Salad-32.jpg


Waldorf Salad is a legendary side dish. Created in 1896 by the dining room manager at New York’s Waldorf-Astoria Hotel, the dish was an instant success and has been gracing dining room tables around the world since then!

While a traditional Waldorf salad contains apples, celery, grapes and mayonnaise, this recipe has no mayonnaise and few fun additions to lighten it up a little bit and make it festive.

YIELD: 8 SERVINGS TOTAL TIME: 15 MINUTES PREP TIME: 15 MINUTES

CRANBERRY WALDORF SALAD


Cranberry Waldorf Salad is a welcome addition to any family meal, it is packed with colorful ingredients to make a one of a kind side that can please a crowd!

This dish can be enjoyed as a salad year round, and I think it is perfect as a side for a turkey dinner! Because of the yogurt, my kids are happy to enjoy this as dessert or breakfast too!

INGREDIENTS:
1 1/2 cups chopped cranberries
2/3 cup seedless green grapes , chopped
2/3 cup seedless purple grapes , chopped
1 apple , chopped
1 cup celery , chopped
1/3 cup raisins
1/3 cup dried cranberries
1/2 cup chopped walnuts
1-2 tablespoons white sugar (or to taste)
1 cup vanilla yogurt
2 teaspoons orange zest

DIRECTIONS:
Combine all ingredients in a large bowl. Toss to combine well.
Cover and chill 2 hours before serving.


https://www.spendwithpennies.com/cranberry-millionaire-salad/

Cranberry-Millionaire-Salad.jpg


YIELD: 10 SERVINGS TOTAL TIME: 25 MINUTES PREP TIME: 15 MINUTES COOK TIME: 10 MINUTES

CRANBERRY MILLIONAIRE SALAD

This Cranberry Millionaire Salad is the perfect side for any turkey dinner! A delicious mixture of fresh homemade cranberry sauce combined with pecans, coconut, marshmallows and pineapple. The result is a sweet and tart side so good you’ll want to eat it for dessert too!

INGREDIENTS:
3 cups Fresh Cranberries
3/4 cup Sugar
1 cup water
1 Cinnamon Stick
2 cups sour cream (or plain greek yogurt)
2 cups pineapple tidbits , well drained
2 cups mini marshmallows
1 cup chopped pecans
2 cups flaked coconut

DIRECTIONS:
1 Combine cranberries, sugar, water and cinnamon stick in a saucepan. Bring to a boil, reduce heat and let simmer 10 minutes. Cool completely (sauce will thicken upon cooling).
2 Add 1 1/2 cups cooled cranberry mixture from step 1 with remaining ingredients and stir well. Let sit 4 hours or overnight.

NUTRITION INFORMATION Yield: 10 servings, Serving Size: 1/2 cup
Amount Per Serving: Calories: 347 Calories


http://espressoandcream.com/2010/11/autumn-chopped-salad.html

8f8b6685f94c7cbb6593800a4e809636.jpg


Autumn Chopped Salad

Ingredients
*6 to 8 cups chopped romaine lettuce
*2 medium pears, chopped (or apples)
*1 cup dried cranberries
*1 cup chopped pecans
*8 slices thick-cut bacon, crisp-cooked and crumbled
*4 to 6 oz. feta cheese, crumbled
*Poppy seed Salad Dressing (I like T. Marzetti)
*Balsamic Vinaigrette (I like Newman’s Own Light Balsamic Vinaigrette)

Instructions
*On a large platter, combine the lettuce, pears, cranberries, pecans, bacon and feta cheese. Drizzle generously with poppy seed dressing, followed by some of the balsamic vinaigrette. (I would estimate that I used about a cup of dressing: 70 percent poppy seed dressing and 30 percent balsamic vinaigrette) If you prefer your salad to have more dressing, feel free to experiment with the combination.


https://www.halfbakedharvest.com/harvest-cranberry-persimmon-and-burrata-salad/

cc3bb8258681b915e502e56ecc3bd535.jpg


harvest cranberry, persimmon and burrata salad.

prep time 10 minutes
cook time 5 minutes
total time 15 minutes
servings serves 6

INGREDIENTS
1/2 cup raw walnuts
1/2 cup pepitas (pumpkin seeds)
2 tablespoon maple syrup
flaky sea salt
3-4 cups baby kale and or arugula
3-4 fuyu persimmons cored + cut into wedges
2 clementines peeled
3/4 cups dried cranberries
8 ounces fresh burrata cheese torn

CRANBERRY BALSAMIC DRESSING
1/4 cup 100% cranberry or pomegranate juice
1/4 cup balsamic vinegar
1 tablespoon lemon juice
1/3 cup olive oil
salt + pepper to taste

INSTRUCTIONS
1 Combine the walnuts, pepitas and maple syrup in a medium size skillet. 2 2vPlace the skillet over medium heat and cook for 5-6 minutes or until the mixture becomes golden, toasted and caramelized. Remove the nuts and seeds from the skillet and transfer to a plate. Sprinkle with salt and let cool.
3 In a large bowl or on a large serving plate, combine the greens, persimmons, clementines and cranberries. Add the torn Burrata cheese and sprinkle on the walnuts and pepitas.
4 In a small bowl, whisk together the ingredients for the dressing. Taste and adjust salt + pepper to your liking. Drizzle the dressing over the salad or serve along side the salad. EAT!
 

kaypohchee

Arch-Supremacy Member
Joined
Oct 10, 2005
Messages
15,493
Reaction score
600
https://www.foodiecrush.com/beet-avocado-and-goat-cheese-salad/

ced6632e8d0e94c23667b3b5074897b6.jpg


Beet-Avocado-and-Goat-Cheese-Salad-foodiecrush.com-04.jpg

About the Recipe

I first had a version of this salad at a favorite Salt Lake City restaurant, Copper Kitchen. Instead of the fried goat cheese balls I use in my version, they serve their rendition with a swath of ricotta cheese. Certainly delicious in it’s original form, but as usual, I had to go and do something different.

While I love ricotta, I decided to replace Copper Kitchen’s ricotta cheese with fried goat cheese for crunch and tang. Like little cheesy crouton bombs. When frying the cheese balls, be sure to watch that oil temperature. I’ve found 350 degrees allows the outside to crisp without burning while the cheese gets warmed in the center and a little to ooze out of the crust.

I flour, egg and bread crumb the balls twice. This gives them a nice crunchy shell.

Beet, Avocado and Fried Goat Cheese Salad

Creamy avocado, earthy beets and crispy fried goat cheese make up this delicious, leafless salad that’s drizzled with a shallot and white balsamic dressing and topped with delicate micro greens.

This salad has lots of layers of varying texture. Creamy avocado. Earthy roasted beets. The crunch of pistachios that do me in every time.

The roasted beets give the salad body. I roasted Chiogga and yellow beets for color and purchased roasted red beets from Trader Joes. A mix of me, myself and I and store-bought convenience. That’s how I like it.

I give you the directions on how to roast your own beets below, but if you’re not into roasting beets or simply don’t have the time, you can certainly use all store bought if you want. I saw that Costco is also carrying them in their refrigerator section.

Beet, Avocado and Fried Goat Cheese Salad

A variety of textures make this leafless salad a favorite. If you're not up to making fried cheese balls, a simple sprinkling of fresh goat cheese would still add a lovely tang.
SERVES 4

Ingredients
8-10 beets, I used a mix of red beets, yellow beets and chiogga beets
⅓ large shallot, peeled and sliced thin
½ cup extra virgin olive oil
2 tablespoons white balsamic vinegar
1 teaspoon sugar
Kosher salt and freshly ground black pepper
Pinch of salt
6 ounces goat cheese, at room temperature
1 egg
½ cup all-purpose flour
½ cup bread crumbs
2-3 cups canola oil
1 avocado, cut in half and seeded
¼ cup shelled pistachios or pistachio meat
Microgreens for garnish
Snipped chives for garnish

Instructions
1 Preheat the oven to 400 degrees F.
2 Wash and trim the beets and pat dry. Place the beets in foil, making packets of 3-4 beets per packet. Drizzle with some olive oil and kosher salt. Wrap the beets tightly and place on a baking sheet then bake for 40 minute to 1 hour or until tender. Remove from the oven, unwrap and set aside to cool.
3 Once cool, rub the skin of the beets off the cooked beet. Using a paper towel sometimes makes this easier. Cut the beets into quarters or chunks and place in a bowl. Set aside.
4 Place the sliced shallot in a small food processor and chop finely. Add the olive oil, balsamic vinegar and sugar and whiz to combine until the dressing is thickened and the shallots are minced fine. Season with kosher salt and freshly ground black pepper. Pour ⅔ of the dressing over the beets to marinate until plating.
5 Remove the seed from the halved avocado and scoop ¼ of the avocado out with a spoon so you have large chunks. Continue with the rest of the avocado and set aside.
6 Roll the goat cheese into small balls about the size of a large gumball. 7 Gather three shallow bowls and place flour in one bowl, whisk egg in another bowl and place the bread crumbs in the remaining bowl. Dredge a goat cheese ball first in flour, then egg and then in the bread crumbs. Repeat flour, egg and bread crumb steps one more times. Set aside and repeat with the rest of the cheese balls.
7 Fry cheese balls in batches of three or four at a time for about 2 minutes or until golden brown. Drain on paper towels.
8 Plate the marinated beets with the avocado chunks and the fried cheese balls that have been sliced in half or kept whole. Drizzle with the remaining shallot dressing and a sprinkling of microgreens, chopped pistachios and snipped chives. Season with additional kosher salt and freshly ground black pepper if desired. Can be served immediately or at room temperature.


https://www.jamieoliver.com/recipes/vegetables-recipes/roast-carrot-and-avocado-salad-with-orange-and-lemon-dressing/

447_1_1436882969.jpg


Roast carrot and avocado salad with orange and lemon dressing

MOROCCAN STYLE WITH CRUNCHY CROUTONS

“With loads of spices, seeds, yoghurt and a delicious citrus dressing, this avocado salad's a winner ”

SERVES 4 COOKS IN 50 MINUTES DIFFICULTY SUPER EASY

Ingredients
500 g medium differently coloured carrots , with their leafy tops
2 level teaspoons whole cumin seeds
1-2 small dried chillies
sea salt , crumbled
freshly ground black pepper
2 cloves garlic , peeled
4 sprigs fresh thyme , leaves picked
extra virgin olive oil
red or white wine vinegar
1 orange , halved
1 lemon , halved
3 ripe avocados
red wine vinegar
4 x 1 cm thick slices ciabatta or other good-quality bread
2 handfuls mixed winter salad leaves (like Treviso, rocket, radicchio or cavolo nero tops) , washed and spun dry
2 punnets cress
150 ml fat-free natural yoghurt
4 tablespoons mixed seeds , toasted

Method
If you’re going to use cooked carrots in a salad you’ve got to make it with some attitude! This fantastic Moroccan-style salad combines roast carrots with avocados – and because they have the same texture in your mouth, I thought I’d add the chargrilled flavour and crunch of toasted ciabatta to round things off. With spices, seeds, yoghurt and a delicious citrus dressing, you’ve got a winner.

1 Preheat the oven to 180°C/350°F/gas 4.
2 Parboil your carrots in boiling, salted water for 10 minutes, until they are very nearly cooked, then drain and put them into a roasting tray. You should flavour them while they’re steaming hot, so while the carrots are cooking get a pestle and mortar and smash up the cumin seeds, chillies, salt and pepper. Add the garlic and thyme leaves and smash up again until you have a kind of paste. The idea here is to build up the flavours. Add enough extra virgin olive oil to generously cover the paste, and a good swig of vinegar. This will be like a marinade, a rub and a dressing all in one! Stir together, then pour over the carrots in the tray, coating them well.
3 Add the orange and lemon halves, cut-side down. These will roast along with the carrots, and their juice can be used as the basis of the dressing. Place in the preheated oven for 25 to 30 minutes, or until golden.
4 While the carrots are roasting, halve and peel your avocados, discarding the stones, then cut them into wedges lengthways and place in a big bowl.
5 Remove the carrots from the oven and add them to the avocados.
6 Carefully, using some tongs, squeeze the roasted orange and lemon juice into a bowl and add the same amount of extra virgin olive oil and a little swig of red wine vinegar. Season, and pour this dressing over the carrots and avocados. Mix together, have a taste and correct the seasoning.
7 Call your gang round the table while you toast or griddle your ciabatta slices. Tear the toasted bread into little pieces and add to the dressed carrot and avocado. Mix together, toss in the salad leaves and cress and transfer to a big platter or divide between individual plates. Spoon over a nice dollop of yoghurt, sprinkle over your toasted seeds and drizzle over some extra virgin olive oil.


https://www.foodiecrush.com/cantaloupe-and-mozzarella-caprese-salad/

Cantaloupe-and-Mozzarella-Caprese-Salad-foodiecrush.com-004.jpg


Cantaloupe-and-Mozzarella-Caprese-Salad-foodiecrush.com-002.jpg


Cantaloupe and Mozzarella Caprese Salad

Prep time 10 mins
Total time 10 mins
SERVES: SERVES 4-6

Ingredients
1 cantaloupe, halved and seeded
1 8-ounce container mozzarella balls (I used pearl size balls)
8-10 slices prosciutto, shredded into large pieces
¼ cup basil leaves, thinly sliced
¼ cup mint leaves, thinly sliced
3 tablespoons extra-virgin olive oil
1½ tablespoons honey
1 tablespoon white balsamic vinegar
Kosher salt and freshly ground black pepper to taste

Instructions
1 Use a melon baller to scoop balls from the cantaloupe halves and add to a large bowl. Add the mozzarella balls and the torn prosciutto. Sprinkle with the basil and mint leaves.
2 In a small bowl, whisk the olive oil, honey and white balsamic vinegar together and season with kosher salt and freshly ground black pepper. Drizzle over the cantaloupe and toss to coat. Season with more salt and pepper and additional herbs to taste.


http://carlsbadcravings.com/asian-pineapple-salad-with-peanut-coconut-dressing-recipe/

Asian-Pineapple-Salad-with-Peanut-Coconut-Dressing-main.jpg


Asian Pineapple Salad with Coconut Peanut Dressing

Prep Time 20 minutes
Servings 8 servings

INGREDIENTS

1 recipe Peanut Coconut Dressing
Asian Peanut Coconut Dressing
Servings 2 cups
INGREDIENTS
1 5.3 oz. container Greek coconut yogurt (I use Chobani)
1/3 cup creamy peanut butter
1-2 tablespoons Asian sweet chili sauce (2 for more kick)
2 teaspoon red curry paste
1 tablespoon lime juice
1 tablespoon sugar
2 tablespoons low sodium soy sauce
3 tablespoons rice vinegar
1/4 cup loosely packed cilantro
1 garlic clove, peeled
3-4 tablespoons milk
1/8 teaspoon ground ginger (optional)

INSTRUCTIONS
1 Add all of the ingredients to your blender and chop then puree until smooth, adding additional milk as need to reach desired consistency. Chill before serving.
2 Store leftover dressing in an airtight container in the refrigerator for up to 7 days.


Salad
1 small head romaine lettuce, chopped
1/2 red cabbage, thinly sliced
2 cups fresh chopped pineapple
1 red bell pepper, chopped
1 cup Matchstick carrots
1 cup julienned jicama
5 green onions, thinly sliced
3/4 cup roasted peanuts, chopped
3/4 cup toasted coconut *

Asian Pineapple Salad with Coconut Peanut Dressing is a salad lover's dream! packed with refreshing pineapple and crunchy peanuts, peppers, carrots, jicama and coconut all doused with the most AMAZING silky Coconut Peanut Dressing that I could drink by itself!

INSTRUCTIONS
Prepare dressing according to directions and chill while you chop ingredients. Dressing is even better prepared and chilled a day in advance.
Combine salad ingredients together in a large bowl. Toss salad with desired amount of dressing OR if expecting leftovers, drizzle dressing on individual salad servings.

RECIPE NOTES
*To toast coconut, spread in an even layer on a baking sheet and bake at 350 F degrees for 5-7 minutes, stirring occasionally and watching closely towards the end as coconut can burn quickly.
**All ingredients are guidelines - add more or less according to taste - I love to add more pineapple!


https://www.sainsburysmagazine.co.uk/recipes/salads/roasted-squash-olive-avocado-and-rocket-salad?

4449-Roasted-Squash-Salad_1120.jpg


Roasted squash, olive, avocado and rocket salad

Ingredients
1 butternut squash (about 1kg)
olive oil, for drizzling
1 tbsp paprika
1 tbsp dried mixed herbs, such as Herbes de Provence
2 x 70g bags rocket
100g pitted olives (we used Kalamata but green work just as well), drained and halved
2 avocados
For the dressing
1 tbsp tamari (gluten-free soy sauce)
2 tbsp cider vinegar
2 tbsp olive oil

Get ahead
1 Roast the squash up to 1 day ahead, cover and chill; bring back to room temperature before serving.
2 Preheat the oven to 200°C, fan 180°C, gas 6. Peel the butternut squash, deseed, then cut it into small bite-sized pieces.
3 Place the pieces into a roasting tin and drizzle with olive oil, sprinkle with the paprika and dried herbs; season and mix everything well.
4 Bake the squash for about 40 minutes. Once it's nice and soft, remove it from the oven and leave it to one side to cool.
Tip If you want to assemble this an hour or two ahead, toss the avocado in a little lemon or lime juice to prevent it from browning.
For the dressing, mix all the ingredients together with a little salt and pepper
5 Put the rocket and olives in a large bowl. Halve and stone the avocados, cut into small cubes and add to the salad with the cooled squash. To serve, pour over the dressing and toss; transfer to a platter.


99b8559d38f325ecf583a2efefcf61ce.jpg


This Chopped Salad Recipe is filled with all good things and packed with flavor! Topped with Cumin Lime Shrimp and tossed with a Cilantro Lime Dressing that is light and flavorful but can be made spicy with a little jalapeno. A delicious way to eat healthy!
 

kaypohchee

Arch-Supremacy Member
Joined
Oct 10, 2005
Messages
15,493
Reaction score
600
https://www.thewickednoodle.com/chopped-thai-salad/

thai-chopped-salad-pinterest.jpg


CHOPPED THAI SALAD WITH COCONUT-CURRY DRESSING

THIS CHOPPED THAI SALAD IS VERY HEALTHY AND TASTES AMAZING! YOU’LL LOVE THE DRESSING AND WILL WANT TO USE IT ON EVERYTHING. ADD CHICKEN OR SHRIMP FOR AN EVEN HEARTIER MEAL.

Ingredients
1 can (low-fat) coconut milk
1/4 cup creamy peanut butter
1 tablespoon yellow curry powder
1 clove garlic
juice of a lime
1-2 teaspoons sriracha
1 teaspoon kosher salt (or to taste)
3 cups chopped kale
2 cups chopped napa cabbage
1 red bell pepper, chopped
1 cup shredded carrots
1 cup chopped mango
1/2 cup chopped peanuts
1/2 cup chopped cilantro

Instructions
1 Place all ingredients in a blender (coconut milk through salt) and blend on high speed until very smooth. Place dressing in a saucepan, bring to a boil then simmer until reduced and thickened, about 10 minutes. Set aside to cool.
2 Place remaining ingredients into a large bowl, toss with dressing and serve immediately.


https://www.theendlessmeal.com/thai-chopped-salad-with-sweet-sesame-mango-dressing/

91eaf1984cb6591604ff62b5a819e3d4.jpg


THAI CHOPPED SALAD WITH SWEET SESAME MANGO DRESSING AND CRISPY WONTONS

Turn this Thai Chopped Salad into a dinner salad by topping it with some thinly sliced steak or chicken, a piece of grilled fish or some crispy tofu. You can also make it ahead of time to take to your summer BBQ or picnic. You're going to love this one!

Makes: 4 dinner-sized portions

INGREDIENTS
For the Sweet Sesame Mango Dressing:
½ ripe mango, peeled and cubed
¼ cup coconut milk
2 tablespoons honey (sub maple syrup for vegan)
2 tablespoons sesame oil
1 teaspoon miso
1 - 1-inch piece of ginger, peeled and minced
Juice from ½ lime
1 garlic clove, minced
Optional: 1 Thai red chili
Sea salt, to taste

For the Crispy Wonton Strips:

Neutral flavored oil, for frying
¼ package of wontons, cut into strips (omit crispy wontons for gluten-free)

For the Thai Chopped Salad:
1 cup frozen edamame beans
4 cups mixed greens, kale or spinach
2 cups red cabbage, very thinly sliced
1 cup sugar or snap peas, cut in half
1 large carrot, thinly sliced
1 red bell pepper, thinly sliced
1½ mangoes, peeled and sliced
1 orange, cut into segments (see notes)
1 handful of cilantro
½ cup toasted cashews
1 tablespoon sesame seeds

INSTRUCTIONS
1 Add all the dressing ingredients to your blender with ½ cup of water and blend on high until smooth. Taste and season with sea salt.
2 Heat 1-inch of oil in a medium-sized frying pan over medium-high heat until it is shimmering. Working in batches, add the wonton strips to the oil and fry until golden and crispy, about 20-30 seconds per batch. Remove from the pan with a slotted spoon and set aside on a paper towel lined plate. Sprinkle a little sea salt over top, if you'd like.
3 Bring the edamame to a boil in a small pot of water for 2 minutes. Drain and rinse with cold water.
4 Add all the salad ingredients to a large salad bowl and toss with the dressing. Top the salad with crispy wonton strips and a sprinkle of sesame seeds.

NOTES
* To cut the orange segments you will need a very sharp knife. Cut the bottom and top off of the orange then use your knife to cut off the peel. Holding the orange in your hand, carefully cut between each membrane to release the orange slices.
If you don't have a very sharp knife, peel the orange as you would if you were going to eat it.
*To make this Thai Chopped Salad ahead of time: Combine all the salad ingredients EXCEPT the orange segments and mangoes and store in a sealed bag. Place the orange segments and mangoes in another bag. Make the dressing and the crispy wontons and store each separately. Toss just before serving.
This salad will keep, stored separately, for 1-2 days.


http://www.oliviascuisine.com/asian-salad-with-sesame-ginger-vinaigrette/?utm_source=P-0969&utm_medium=FB&utm_campaign=SocialFabric

530624fd62999c1d1c20cd08dd26bd81.jpg


ASIAN SALAD WITH SESAME GINGER VINAIGRETTE

PREP TIME 15 mins
TOTAL TIME 15 mins
Author: Olivia's Cuisine
Serves: 4

INGREDIENTS
For the salad:

1 cup shelled edamame, frozen
4 cups packed baby spinach
2 cups watercress (thin stems and leaves only)
2 carrots, peeled and julienned
4 broccoli stems, peeled and julienned
1 green mango, peeled and julienned
1 medium cucumber, thinly sliced

For the dressing:
1 teaspoon finely minced ginger
1 garlic clove, minced
2 teaspoons agave nectar
3 tablespoons rice vinegar
1 teaspoon soy sauce
5 tablespoons canola oil
2 tablespoons sesame oil

Garnishes:
⅓ cups peanuts, crushed
2 tablespoons toasted sesame seeds

INSTRUCTIONS
Make the dressing:
Combine all the ingredients in the blender and blend until smooth. Reserve.

Make the salad:
1 Start by cooking edamame according to package instructions.
2 Place all the salad ingredients (including the cooked edamame) in a bowl, drizzle with the dressing and toss.
3 Garnish with sesame seeds and crushed peanuts and serve.

NOTES
The dressing can be made ahead and refrigerated for up to 3 days.
You can also cook the edamame ahead of time and refrigerate until ready to use.


http://www.thelondoner.me/2015/01/pad-thai-salad-low-carb.html

wpid24026-Low-Carb-Pad-Thai-Recipe-3.jpg

wpid24048-Low-Carb-Pad-Thai-Recipe-14.jpg


To make enough for two generous portions, you’ll need:
1 Cucumber
2 Large carrots
2 Spring onions
1 Handful of fresh coriander
1 Handful of fresh mint
1 Handful of peanuts (roughly chopped/smashed)

A couple of handfuls of shredded chicken/beef/duck/prawn/tofu/boiled eggs/whatever you fancy!

Dressing:
Juice of 1 lime
3tbsp Sesame oil
3tbsp Soy sauce
1tbsp Fish sauce
1tbsp chilli flakes
1tsbp honey
1 Clove of garlic

I’m aware that this isn’t a classic Pad Thai recipe, but trust me… you’ll love it.

1 Start by turning your carrots and cucumber into noodles/ribbons. Pop them into a large bowl.
(If you’re in the market for a spiralizer, this is the best of any I’ve tried.)
https://www.amazon.co.uk/gp/product...&redirect=true&ref_=oh_aui_detailpage_o00_s00

2 Use a pair of scissors to snip the spring onions over the top.
3 Add your protein.
4 Snip over your coriander.
5 And your mint.
6 Now make you’re dressing.
7 Peel your garlic, add the rest of the ingredients.
8 Shake it up baby!
Twist and shout! Come on, come on, come, come on baby now, come on and work it on out!
Well work it on out, honey, you know you look so goooood…
Sorry, couldn’t resist.
9 Pour it over your salad.
10 Mmmm… breathe in that goodness! Fragrant.
11 Toss it up.
12 Bash up your nuts.
13 And sprinkle over the top.
14 Step back and admire your handiwork…
15 Phuket, let’s eat! Tuck in.


https://www.snixykitchen.com/2015/06/06/sesame-ginger-miso-cucumber-salad/

SesameGingerMisoCucumberSalad-1-680x1020.jpg

SesameGingerMisoCucumberSalad-7-680x1020.jpg


Sesame Ginger Miso Cucumber Salad

AUTHOR: Sarah Menanix
YIELDS: 4-6 side servings

INGREDIENTS
Salad
2 large english cucumbers
1½ cups frozen shelled edamame, defrosted
2 medium carrots, julienned
1 tablespoon toasted white and black sesame seeds (you can also just use one kind if you want!)
Optional: 1 sheet of nori, cut into small 1-inch long ⅛-inch wide strips.

Sesame Ginger Miso Dressing
2½ tablespoons white miso
1½ tablespoons hot or warm water
2 tablespoons rice vinegar
1 tablespoon + 1 teaspoon finely grated ginger, peeled
1 tablespoon honey or maple syrup
1 tablespoon + 1 teaspoon sesame oil
2 teaspoons lemon juice (from 1 lemon)
½ teaspoon tamari sauce (or soy sauce)

INSTRUCTIONS
1 Prepare the cucumber noodles: slice off the very top and bottom of the cucumber and then slice it in half cross-wise (so you have two short cylindrical pieces. Run the cucumber through the spiralizer with the wide ribbon blade, cutting the noodles every 12-15 inches. If you don't have a spiralizer, you can cut the cucumber in half lengthwise, scrape out the seeds, and thinly slice the cucumber into half-rounds.
2 Toss the cucumber ribbons or slices with the edamame and carrots.
3 In a small bowl whisk together the miso and water until completely smooth. Add the rest of the dressing ingredients and whisk to combine. Taste and adjust to your liking (some like it sweeter, some like it saltier).
4 Toss the dressing with the vegetables. (Pour as much of the dressing over the salad as you'd like. I used all of the dressing, but this might vary depending on the size of your cucumbers. Taste and add more dressing, if needed.)
5 Sprinkle sesame seeds on top and if desired, serve with slices of nori on top.
 
Last edited:

kaypohchee

Arch-Supremacy Member
Joined
Oct 10, 2005
Messages
15,493
Reaction score
600
Sunday Meals

My IF lunch of the Shanghai Dumplings wrapped last night - with green veg soup since mom forgot supposed to be having this n had cooked rice for lunch as decided to go church today !
PvJIzPVl.jpg

HAajE5Al.jpg

v4JCDgol.jpg


Mistake of not 'storing' or 'oiling' the dumplings separately as only used tissue paper (sheer convenience as doing the prepping in living room sofa last night)
to separate the stacked layers only ....they became stuck to each other after overnight in fridge covered by foil !!!

Had to steam them in batches as unseparated smaller masses otherwise bigger holes will form in the skin !!!

Prepping the water chestnuts before mixing into seasoned minced meat chives n mushroom ....
N0pkuigl.jpg

Ufqtkg7l.jpg


Tea time with 3-in-1 coffee n 2 soon kuehs
qZyDcCCl.jpg


Pork fallopian intestine n meatball porridge for dinner + youtiao
1nbnh46l.jpg


A shared mango
wr0ZfXgl.jpg


Sent from Asus ASUS_Z011D using GAGT
 

kaypohchee

Arch-Supremacy Member
Joined
Oct 10, 2005
Messages
15,493
Reaction score
600
http://www.eatyourselfskinny.com/spicy-tuna-avocado-wrap/

9038ef0e5be8e22afeaab34860132bf5.jpg


Spicy Tuna Avocado Wrap

Serves: 4 Servings

INGREDIENTS
2 (5 oz) cans Bumble Bee® Solid White Albacore Tuna, drained
1 avocado
2 Tbsp Sriracha
1 Tbsp Dijon mustard
2 to 3 Tbsp celery, chopped
2 Tbsp red onion, chopped
2 green onions, chopped
1 Tbsp fresh cilantro, chopped
Salt and pepper, to taste
2 heaping cups leafy green lettuce
1 cup matchstick carrots
4 (10 inch) whole wheat tortillas

INSTRUCTIONS
1 In a medium bowl, mash together tuna and avocado until combined. Add in the rest of the ingredients through the salt and pepper, mixing well.
2 To assemble, top each tortilla with a ½ cup leafy greens, ¼ cup matchstick carrots and divide the tuna mixture evenly among the wraps. Tightly roll up the tortilla, slice and enjoy!


https://www.culinaryhill.com/ultimate-veggie-wrap/?m

ebabbff197484ad97190eb8b79622745.jpg


Ultimate Veggie Wrap

The Ultimate Veggie Wrap has herbed cream cheese, Havarti, and lots of fresh vegetables! Best of all, make it ahead for an easy lunch option.

Prep Time 20 minutes
Cook Time 5 minutes
Total Time 25 minutes
Servings 4 servings
Calories 390 kcal

Ingredients
4 Flatout flatbread Original wraps
1/2 cup Green Goddess Cream Cheese or purchased cream cheese
8 large lettuce leafs
4 Roma tomatoes thinly sliced
2 Persian cucumbers thinly sliced lengthwise
2 carrots peeled and julienned
4 slices Havarti cheese cut in half

Instructions
1 Arrange Flatout flatbreads on a flat surface. Top each with 2 tablespoons of cream cheese.
2 Layer 2 lettuce leaves in the middle of flatbread. Arrange tomatoes in a single row, then top with cucumbers, carrots, and sprouts, if using.
3 Arrange cheese on top of vegetables and roll the wrap. Wrap tightly in plastic wrap or wax paper and refrigerate until serving time. Slice in half to serve.


https://hurrythefoodup.com/tangy-veggie-wrap/

ab1cc664a4ec445bb7e2dc4d5e7444f3.jpg


Tangy Veggie Wrap

A refreshing and tangy summer veggie wrap that’s easy to make and perfect for on the go - ideal for bbqs, picnics or wherever it’s needed!

Course Salad
Cuisine Vegetarian
Prep Time 25 minutes
Total Time 25 minutes
Servings 2 wraps
Calories 298 kcal
Author HurryTheFoodUp

Ingredients
3 tbsp sunflower seeds
2 small carrots
1 small red onion
1/4 bell pepper (your favourite colour)
1 small handful spinach or similar
0.5 inches ginger (0.4 inches = 1 cm)
1/3 cup cottage cheese (1/3 cup = 100 g)
1/5 cup Greek yogurt/sour cream 1/5 cup = 50 g)
1/2 a lemon's zest
2 tbsp dijon mustard (or try wasabi paste, but less!)
2 tortilla wraps
Salt and pepper
Optional
2 big spoons bean sprouts - if you like them (they're really healthy! And they add a lovely crunch too)

Instructions
For the wrap:
1 Roast the sunflower seeds in a pan without any oil/fat until golden brown.
2 Peel and grate the carrots. Wash and dice the the bell pepper (get rid of the seeds and white bits).
3 Peel the onion and cut in thin rings. Wash and drain the spinach. Wash the bean sprouts with cold water and let them dry.
For the dressing:
1 Peel the ginger and grate it into a bowl. Add the cottage cheese, Greek yogurt (or your vegan substitute), lemon zest and dijon mustard and mix it well.
2 Spread the dressing mixture onto the wraps, stopping about 1cm from the edge. Lay out the spinach leaves on top.
3 Put the carrots, bell pepper, onions and bean sprouts in a wide line down the middle and sprinkle the roasted sunflower seeds on top.
4 Season with a dash of salt and pepper and fold the wraps a little on both sides, then at the bottom and roll it as tightly as possible (without squishing the insides out!).
5 Cut the wraps into halves and serve. Enjoy!


https://www.tasteslovely.com/california-turkey-club-wrap/

1f3029b9e3a33c24befd33735de43f22.jpg


California Turkey Club Wrap

Prep time 5 mins
Total time 5 mins

Author: Tastes Lovely
Serves: 1 wrap

Ingredients
1 spinach tortilla wrap
mayonnaise
mustard
2 ounces Oscar Mayer Selects Natural Slow Roasted Turkey Breast
2 slices of cooked bacon
2 ounces avocado, sliced
2 slices of tomato
1 cup of shredded iceberg lettuce

Instructions
1 Assemble the turkey wrap by layering in the order the ingredients are listed. 2 Wrap, cut, and serve.
Will keep wrapped in saran wrap for 3 days if you are making it in advance for lunch for the week.


https://thebestblogrecipes.com/avocado-ranch-chicken-salad-wrap/

efe3f16812b1659b15db17444a3fbce7.jpg


AVOCADO RANCH CHICKEN SALAD WRAP

This easy Avocado Ranch Chicken Salad is loaded with flavor (and contains no mayonnaise) for a deliciously lighter version of a typical chicken salad.

INGREDIENTS:
4 light Flatout flatbreads
1 avocado , peeled & pitted
1/2 tablespoon lemon juice
1/3 cup fat free Greek yogurt
1/3 cup light ranch dressing (bottled or homemade)
1 tablespoon fresh dill
1 tablespoon fresh parsley
salt & pepper to taste
2 cups cooked chicken
1 cup diced celery
OPTIONAL
lettuce
tomato slices

DIRECTIONS:
1 Place avocado and lemon juice in a bowl. Mash until almost smooth (a few little chunks are ok).
2 Stir in yogurt, dressing, dill, parsley and salt & pepper. Add chicken and celery and mix well.
3 Place one light Flatout flatbread on your surface. Top with lettuce and tomato if using. Add chicken mixture and roll snugly. Slice in half and serve.


https://www.wellplated.com/asian-chicken-wraps-thai-peanut-sauce/print/

44b72687ef2b7aeee9db5e077b1cd08e.jpg


Asian Chicken Wraps with Thai Peanut Sauce

Packed with chicken, carrots, edamame, and an addictive Thai peanut sauce, these healthy Asian chicken wraps are a fast and delicious dinner or lunch.

YIELD: 4 wraps TOTAL TIME: 30 minutes

Ingredients:
For the Sauce
1/3 cup creamy peanut butter
2 tablespoons soy sauce
2 tablespoons honey
1 tablespoon Sriracha or similar spicy chili sauce
1 tablespoon minced fresh ginger
1 tablespoon fresh lime juice

For the Chicken Wraps
14 ounces Just BARE Boneless Skinless Chicken Breast Fillets (about 2 medium breasts)
1 tablespoon canola or grapeseed oil, divided
2 cups broccoli slaw
1 cup shelled edamame, thawed if frozen
1/2 cup shredded carrots
1/2 cup finely chopped green onions
1/4 cup dry roasted salted peanuts, chopped
Chopped fresh cilantro
4 whole wheat tortillas

Directions:
1 In a small bowl, stir together all of the sauce ingredients: peanut butter, soy sauce, honey, Sriracha, ginger, and lime. Set aside.
2 Cut the chicken into bite-sized pieces. Heat half of the oil in a large, non-stick skillet over medium high. Once the oil is shimmering, add the chicken (be careful as the oil may splatter), and sauté the chicken until fully cooked, about 2-3 minutes per side. Transfer to a bowl and blot away any excess oil.
3 To the bowl, add 1/4 cup of the peanut sauce, then toss to coat the chicken. Reserve the rest of the sauce for serving.
4 To the same skillet in which you cooked the chicken, add the remaining oil and let warm for 30 seconds. Add the broccoli slaw, edamame, carrots, and half of the green onions and sauté until crisp-tender, about 2 minutes. Remove from heat.
5 To assemble wraps, spread a spoonful of the reserved sauce on each tortilla. Top with the chicken, vegetables, chopped peanuts, remaining green onions, and fresh cilantro. Wrap and enjoy warm or at room temperature.

Filling can be prepared up to 1 day in advance. Assembled wraps can be made up to 4 hours in advance and stored in the refrigerator (or your lunch box) until ready to serve.


https://ourlifetastesgood.blogspot.sg/2016/03/mediterranean-meatball-gyros-sandwich.html

bebd153a7ffb6521ffe6c9460e98db2e.jpg


Mediterranean Meatball Gyros Sandwich

Yield: 4 Servings
Prep Time: 15 mins.
Cook time: 15 mins.
Total time: 30 mins.

Ingredients
1 cup Greek yogurt
1/4 cup grated cucumber
1 teaspoon freshly minced garlic
1 teaspoon extra virgin olive oil
1 tablespoon fresh dill
1/2 teaspoon sea salt
1/4 teaspoon freshly cracked black pepper
1 tablespoon fresh lemon juice
1 pound ground chuck
1/4 cup dry Italian breadcrumbs
1 large egg
2 tablespoons chopped fresh flat-leaf Italian parsley
1 tablespoon freshly minced garlic
1/2 teaspoon ground cumin
1/2 teaspoon sea salt
1/4 teaspoon freshly cracked black pepper
1 cup finely diced cucumbers
1 cup finely diced tomatoes
1/2 cup finely diced red onion
1 tablespoon chopped flat leaf Italian parsley
salt & pepper to taste
4 Flatbreads

Instructions
1 Combine 1 cup Greek yogurt with 1/4 cup grated cucumber, 1 teaspoon freshly minced garlic, 1 teaspoon olive oil, 1 tablespoon fresh dill, 1/2 teaspoon sea salt, and 1/4 teaspoon pepper. Mix in 1 tablespoon fresh lemon juice and stir to combine. Give it a taste and adjust the flavors to your liking. Cover and refrigerate until ready to serve.
2 Preheat the oven to 425°F. In a large mixing bowl, combine 1 pound ground chuck, 1/4 cup dry Italian breadcrumbs, 1 large egg, 2 tablespoons chopped fresh flat-leaf Italian parsley, 1 tablespoon freshly minced garlic, 1/2 teaspoon ground cumin, 1/2 teaspoon sea salt, and 1/4 teaspoon freshly cracked black pepper.
3 Mix well to combine and then form into meatballs. I use a medium size scoop to get them uniform in size, or if I'm away from home I have even used a 1/8 measure cup to measure the meat and then roll into a ball. Place them on a lightly greased baking sheet and bake in the pre-heated oven for about 10 minutes or until cooked through and no longer pink inside. Cooking time will vary depending on the size of your meatballs.
4 While the meatballs are cooking, dice 1 cup cucumbers, 1 cup tomatoes, 1/2 cup red onions, and a tablespoon of flat leaf parsley and combine in a serving dish. Salt & pepper to taste.
5 When the meatballs are cooked through, remove them from the oven to rest. Turn the oven up to broil and place the flatbread on a baking sheet. Broil for until lightly toasted on both sides. Remember to keep the oven door ajar when broiling and watch them closely so they don't burn!
6 To assemble, place about 4 meatballs down the center of each flatbread. Spoon a generous amount of Tzatziki sauce down the center next to the meatballs and top with a heaping spoonful of the tomato and cucumber salad. Wrap up and enjoy!
 

kaypohchee

Arch-Supremacy Member
Joined
Oct 10, 2005
Messages
15,493
Reaction score
600
https://www.bakedbyanintrovert.com/corned-beef-hash-tortilla-cups/?pp=1

7b0035e07fce9698896205dd09fac9f2.jpg


Corned Beef Hash Tortilla Cups

Corned beef hash is great on its own, but when baked into cheesy tortilla cups, it’s even better. Assembly and prep takes just a few minutes, making these cups a great recipe for breakfast or lunch. They would even make a delicious appetizer when you are pressed for time and need a fast, unique, and flavorful option!

Course Breakfast
Prep Time 15 minutes
Cook Time 30 minutes
Total Time 45 minutes
Yields 8 tortilla cups
Author Jen Sobjack

Ingredients
1 (15 ounce) ounce Hormel MARY KITCHEN® Corned Beef Hash
8 (6 inch) flour tortillas
5 large eggs
3/4 cup sour cream
1/2 teaspoon ground white pepper
3 teaspoons Dijon mustard
2 cups shredded Gouda cheese plus 1/4 cup
1/2 cup diced green bell pepper
1/4 cup diced onion
1 tablespoon fresh parsley for garnish

Instructions
1 In a medium skillet, cook the corned beef hash according to the instructions on the can. Remove from heat and set aside to cool.
2 Preheat the oven to 400°F. Gently press the tortillas into 8 jumbo muffin cups. Set aside.
3 Whisk together the eggs, sour cream, white pepper, and Dijon mustard. Stir in the 2 cups cheese. Pour 1/4 cup of the mixture over each tortilla cup. Add the diced peppers and onions to the cooked corn beef hash and mix well.
4 Sprinkle 1/4 cup of the hash mixture over each of the filled cups. Sprinkle a little of the remaining cheese over the top of each cup.
5 Bake for 20 to 25 minutes, until tortillas are golden brown and centers are cooked through. If the tortillas begin to get too brown, tent the cups with foil. 6 Allow to cool for 10 minutes. Sprinkle fresh parsley over each cup and serve.


http://www.closetcooking.com/2016/03/bacon-and-cheese-corned-beef-burgers.html

a8e6837c7581e05217cfaaaa48f5e3b0.jpg


Bacon and Cheese Corned Beef Burger with Guinness Caramelized Onions and a Fried Egg

Prep Time: 5 minutes Cook Time: 1 hour 10 minutes Total Time: 1 hour 15 minutes Servings: 4

Tasty corned beef burgers topped with Guinness caramelized onions and melted cheese along with bacon and a fried egg!

ingredients
1 tablespoon oil
1 large onion, sliced
1 cup Guinness (or beef broth)
1 teaspoon Worcestershire sauce
2 teaspoons grainy mustard
8 strips bacon
1 1/2 pounds corned beef, ground in food processor
4 slices white cheddar (or swiss) cheese
4 eggs
4 buns

directions
1 Heat the oil in a pan over medium heat.
2 Add the onions and saute until tender, about 5-7 minutes.
3 Add 1/4 cup Guinness , cover and simmer until the liquid has mostly evaporated, about 15 minutes and repeat three more times = 60 mins.
4 Remove from heat and mix in the Worcestershire sauce and grainy mustard.
5 Meanwhile, cook the bacon in a pan and set it aside on paper towels to drain.
6 Form the ground corned beef into 4 patties and grill or pan fry over medium high heat until cooked, about 3-5 minutes per side, topping with the cheese.
7 Fry the eggs [runny yolk !], assemble the burgers and enjoy!

Nutrition Facts: Calories 727, Fat 45.6g (Saturated 19g, Trans 0g), Cholesterol 313mg, Sodium 2264mg, Carbs 26g (Fiber 1g, Sugars 5g), Protein 44.5g
 

yonglimm

Arch-Supremacy Member
Joined
May 13, 2012
Messages
18,121
Reaction score
2,024
Tea time with 3-in-1 coffee n 2 soon kuehs
qZyDcCCl.jpg


Pork fallopian intestine n meatball porridge for dinner + youtiao
1nbnh46l.jpg

Another day of cheat meals? :s8:...u have a total of 7 cheat days in a week?..LOL

3-in-1 coffee = low carb? :s13:
soon kueh drenched in black sweet sauce & sweet chili sauce = low carb? :s13:
white rice porrdige = low carb? :s13:
YOU TIAO = LOW CARB? :eek::s13:

SIAOLANG SIBEH HO CHEO....Monday morning oredi make me laugh until so hard....
 

kaypohchee

Arch-Supremacy Member
Joined
Oct 10, 2005
Messages
15,493
Reaction score
600
Think this recipe is the closest to what I've been told from my friend's maid - single flour coating to the Crispy Garlic Chicken Wings marinated in just salt n GRATED garlic overnight [for 2 nights due to circumstances like no cooked dinner last night since mom went to church n tarpaued pork porridge dinner home for me etc ...]


Crispy Garlic Chicken Wings Recipe

http://www.bellaonline.com/articles/art14815.asp

These crispy garlic chicken wings make the perfect party snack. Coated with a mixture of flour, cornstarch and spices, these wings can be tailored to your exact tastes. If you love your wings spicy and full of flavor, simply add additional garlic salt and crushed red pepper. And if you are one of those people like my husband who likes them super crispy, simply fry them a second time to get a deep golden brown crunch. Try this recipe and let me know what you think in the Chinese food forum, Enjoy!

To watch a video for these instructions see above.

14 whole chicken wings
1 medium egg ?
peanut oil for frying
sweet chili sauce for serving

Marinade:
6 tbsp soy sauce
1/2 tsp garlic salt
1/4 tsp ground ginger

Coating:
1 cup cornstarch
1 cup flour
1 tsp garlic salt
1 tsp or more crushed red pepper

1 Rinse off the wings with cold water and then dry them with paper towels. Cut the wings right at the joint so that you have 2 pieces. Then cut off the wing tips and discard them. This will make 28 wings in total.
2 Once the wings are cut, place them in a large bowl. Using your hand, thoroughly mix in all of the marinade ingredients. Then let them sit at room temperature for 30 minutes.
3 In a large bowl, mix together all of the ingredients for the coating and then set this mixture aside. If you want more garlic flavor, add ½ tsp or 1 tsp extra of garlic salt. And if you love your wings spicy, simply add another tsp or two of crushed red pepper.
4 Once the wings have marinated for 30 minutes, drain them in a colander, thoroughly removing all of the excess marinade. Then return them to the bowl.
5 Add the egg ? to the wings, mixing it in with your hand so that each wing is thoroughly coated.
6 Place the wings, a few at a time into the coating mixture, tossing them with your hand to make sure that they are evenly coated. Leave all of the wings in this mixture as you continue to add more and coat them.
7 Once all of the wings are thoroughly coated, add 2 to 3 cups of peanut oil to a wok and heat it on high.
8 When the oil is hot, add the wings directly from the coating mixture, shaking them off and adding them one at a time. Cook about 6 to 7 wings at one time making sure not to overcrowd the wok.
9 Cook the wings for about 5 minutes, or until brown.
10 Then remove them with a slotted spoon and place them on a plate lined with paper towels.
11 Continue cooking the remaining wings in batches.

For extra crispy wings, once they are all finished cooking, fry them a second time for just 2 to 3 minutes on high.

These are great served with a side of sweet chili sauce for dipping. Makes 28 wings.


How To Make Crispy Spicy Fried Chicken Recipe - Buttermilk Brine

Spicy-Crispy-Fried-Chicken-683x1024.jpg


http://divascancook.com/spicy-crispy-fried-chicken-recipe/

Spicy Crispy Fried Chicken

Author: Divas Can Cook

Ingredients
BRINE
½ gallon buttermilk
4 cloves garlic, crushed
½ white onion sliced
½ cup hot sauce ( I used Franks)
3 Tablespoons salt (optional, but adds great flavor)
3 lbs fresh whole chicken, cut up

SEASONING BLEND
1 Tablespoon sugar
1 Tablespoon salt (can add more if desired)
1 Tablespoon black pepper
1 Tablespoon onion powder
1 Tablespoon cayenne (can more if desired)
1 Tablespoon cajun seasoning
1 Tablespoon paprika
1 Tablespoon garlic powder
1 Tablespoon poultry seasoning
1 teaspoon celery salt
1 teaspoon smoked salt
½ tablespoon chili powder
3 cups self-rising flour

Egg Mixture
3 eggs
¼ cup water
½ cup hot sauce (can use more if desired)
1 teaspoon garlic powder

Peanut oil or shortening, for frying
Cajun seasoning, for sprinkling (if desired)

Instructions
1 In a large bowl, lined with a brining or roasting bag, combine buttermilk, garlic, onion slices, ½ cup hot sauce and salt (if using).
2 Add chicken and tie the bag close so that the chicken is completely submerged in the brine.
3 Refrigerate for up to 3 hours.
4 Pour off the brine and shake off excess brine from chicken. (You can rinse if desired. I didn't)
5 Combine the seasoning blend.
Taste the seasoning blend to make sure it is salty and spicy enough for your taste. Adjust the seasoning if needed.(It should taste bold)
6 Place chicken on a baking tray and sprinkle on up to half of the seasoning mixture generously over the chicken on both sides. Set aside.
7 Mix the rest of the spices into the flour. DO THIS GENTLY. IF THAT SPICY FLOUR "SMOKE" GETS IN YOUR NOSTRILS IT WILL BURN. TRUST ME. Taste the flour and make sure it tastes seasoned Add in more seasoning to your liking. Flour SHOULD taste seasoned. (I usually add in more salt, garlic powder, onion powder, and cayenne)
8 Place the flour mixture into a large paper bag.
9 Add chicken to the bag.
10 Close the bag tightly and shake to coat the chicken.
11 Remove the coated chicken from bag and shake off the excess flour. Set aside.
12 In a large dish, combine eggs, water, hot sauce and garlic powder.
13 Dip each piece of coated chicken into the egg mixture and shake off the excess egg mixture. (Use one had to place the chicken in the mixture and the other hand to pull it out to minimize clumping)
14 Place chicken back into paper bag and shake to coat one last time.
15 Remove chicken from bag and place on a plate. It's time to fry!
16 Add oil to deep skillet and heat until a test piece of flour fries gently. (about 350 degrees. See Note)
17 Add chicken to skillet and cook until golden. (Oil should completely cover chicken. Fry dark meats together and white meats together. Do not overcrowd the pan.)
18 When done, place chicken on a plate lined with paper towels to drain.
19 Sprinkle with cajun seasoning as soon as the chicken come out of the oil, if desired.
20 Serve hot and add hot sauce!

Notes
Cooking the Chicken:
Average Cooking Time for 325 degree:
White Meat- 16-20 minutes (I cooked mine for 13 minutes)
Dark Meat- 20-30 minutes (I cooked mine for 16 minutes)
As you can see my cooking time varies a lot from the standard cooking time. My chicken was small so you may need more or less.


Country Fried Chicken - buttermilk brine but no egg coating


IMG_6003-1024x724.jpg


http://divascancook.com/country-fried-chicken-recipe-southern-buttermilk-easy

Country Fried Chicken

Author: divas can cook

Ingredients
5 lb chicken, cut up
BRINE
2 cups buttermilk
2 Tablespoon kosher salt
1/4 cup hot sauce

SPICE BLEND (you’ll have plenty left over, it’s great on chicken)
1 tablespoon sugar
1 tablespoon seasoning salt
1 tablespoon paprika
1 tablespoon black pepper
1 tablespoon garlic powder

FLOUR COATING
1 1/5 cups self-rising flour
salt
black pepper
celery salt

Instructions
1 Combine brine ingredients in a bowl.
2 Place chicken in a small bowl and pour brine over chicken. Chicken should be completely submerged in the brine.
3 Refrigerate for 1 hour.
4 After an hour pour off the brine (and rinse chicken off thoroughly, shaking off excess water.)
5 Mix together the spice blend ingredients.
6 Place chicken on a plate or tray and season generously. You will have plenty of seasonings left over.
7 Season the flour with salt, pepper and celery salt. Taste the flour, it should taste seasoned.
8 Coat the chicken pieces in the flour.
9 Let sit for 10 minutes until the flour absorbs a little.
10 Recoat the chicken in flour.
11 Heat oil in deep fryer to 325.
12 Place chicken in hot oil and fry until golden brown. Fry dark meats together and white meats together. Cooking time will vary based on the size of the chicken and method used.
13 Juices will run clear when done.
14 Drain on paper towels on a wire rack. (if needed keep cooked chicken in a 225 degree preheated oven to keep warm while the other chicken cooks.
15 Serve hot!!
16 Enjoy!

Notes
~TIPS~
Cooking time will vary based on the size of your chicken parts.
Feel free to change up the seasonings or keep it simple with just salt and pepper!
I prefer using smaller, organic chickens. The larger ones take much longer to fry.


Crunchy Korean fried chicken recipe (Dakgangjeong: 닭강정)

2-590x359.jpg


https://www.maangchi.com/recipe/easy-dakgangjeong

No egg coating - only corn or potato starch coating - 2nd frying for extra crunchiness

Ingredients
3½ pounds chicken wings (about 1.6 kg), washed and drained
½ teaspoon salt
½ teaspoon ground black pepper
1 teaspoon minced ginger
2/3 cup potato starch or corn starch
⅓ cup peanuts (optional)
4 cloves garlic, minced
3 to 4 large dried red chili peppers, seeded, cut crosswise into ⅓ inch pieces (optional)
¼ cup soy sauce
½ cup rice syrup or corn syrup
1 tablespoon white vinegar
1 tablespoon mustard (optional)
1 tablespoon brown sugar
1 tablespoon sesame seeds
Grapeseed oil (or vegetable oil, peanut oil)

Directions
1 Cut off the tip of each wing and chop the wing in half. After this is done you should have about 3 pounds of chicken, with 24 to 26 pieces.
2 Put the chicken in a bowl and mix with salt, ginger, and ground black pepper by hand.
3 Put 2/3 cup potato starch in a bowl and dip each wing in the powder to coat it, one by one. Squeeze each wing to press the coating to it tightly.

Steps:
Mix chicken with seasonings and cover in starch.
4 Fry in hot oil for 7 to 8 minutes.
5 Shake off, let sit, then fry for another 12 to 15 minutes.
6 Coat in seasoning sauce.
7 Sprinkle sesame seeds over top and serve immediately.

Make the sweet, spicy, and sticky sauce:

1 Heat a large non-stick skillet or wok over medium high heat. Add 2 tablespoons cooking oil, minced garlic, and the dried red chili pepper.
2 Stir with a wooden spoon until fragrant for about 30 seconds.
3 Add soy sauce, rice syrup, vinegar, and mustard sauce (optional). Stir with a wooden spoon and let it bubble for a few minutes.
4 Add the brown sugar and continue stirring. Remove from the heat. Set aside.

Fry the chicken:

1 Put 4 cups of cooking oil in a frying pan or pot and heat it up for 7 to 8 minutes over high heat.
2 See if the oil’s ready by dipping a test wing into it. If the oil bubbles, it’s hot enough to start frying. Slide the coated wings one by one into the hot oil and cook for about 12 to 13 minutes, turning over a few times with tongs.
3 Take the wings out of the oil and shake them off in a strainer. Turn off the heat, and let the wings sit for a few minutes.
4 Reheat the oil and fry the wings again for another 12 to 15 minutes until they all look golden brown and feel super crunchy through the tongs. If your frying pan or pot is not large enough to fry all the chicken at once, divide it into batches like I do in the video. If you use a larger frying pot to cook them all at once, you’ll have to use more cooking oil.

Coat the fried chicken with the sauce:

When the chicken is done, reheat the sauce until it bubbles.
Add the hot chicken and mix well with a wooden spoon to coat.
Remove from the heat and transfer the coated chicken to a large platter. Sprinkle some sesame seeds over top and serve immediately. This chicken won’t lose its crunchiness, even by the next day. You don’t need any dipping sauce, but it goes well with Baek-kimchi.https://www.maangchi.com/recipe/baek-kimchi


FRIED CHICKEN WINGS, TAKEOUT STYLE

http://thewoksoflife.com/2015/04/fried-chicken-wings-takeout-style/

fried-chicken-wings-4.jpg


I remember my father used to make a tray full of wings piled high each day at our restaurant and it was never written down but rest assured that this special deep fried chicken wings recipe was in his head and he could make them in his sleep if he had to. They were pre-fried in the morning and re-fried to order throughout the day, and those mountains would turn into molehills real fast during the lunch, dinner and late night rush hours. Once a week, at the end of the night, we would toss a few into the fryer and serve them with our dinner. No matter what we were having, they were always a favorite.

Serve these tasty fried chicken wings on a nice bed of roast pork fried rice or vegetable fried rice. For me, I actually prefer a bed of white rice with some hot sauce or spicy hot oil, like the one used in our Lanzhou Beef Noodle Soup, but hey, that’s just me.

Fried Chicken Wings, Takeout Style

Prep time 2 hours
Cook time 20 mins
Total time 2 hours 20 mins

Chinese take-out fried chicken wings are the same as regular old fried chicken, right? Wrong. This fried chicken wings recipe is a special family recipe
Author: Bill
Recipe type: Chinese takeout
Cuisine: Chinese
Serves: 10 whole wings

Ingredients
10 whole chicken wings, washed and pat dry
⅛ teaspoon black pepper
¼ teaspoon white pepper
¼ teaspoon garlic powder
1 teaspoon salt
½ teaspoon sugar
1 tablespoon soy sauce
1 tablespoon Shaoxing wine
1 teaspoon sesame oil
1 egg
1 tablespoon cornstarch
2 tablespoons flour
oil, for frying

Instructions
1 Combine all the ingredients (except the frying oil, of course) in a large mixing bowl.
2 Mix everything until the wings are well-coated. Let the wings marinate for 2 hours at room temperature or in the refrigerator overnight for best results. (If you refrigerate the wings, be sure to let them come to room temperature again before cooking).
3 After marinating, if it looks like there is liquid in the wings, be sure to mix them thoroughly again. The wings should be well coated with a thin batter-like coating. If it still looks too watery, add a bit more corn starch and flour.
4 Fill a medium pot about ⅔ of the way up with oil, and heat it to 325 degrees F.
5 Fry the wings in small batches for 5 minutes and remove to a sheet pan lined with paper towels. After all of the wings are fried, return them in batches to the oil and fry again for 3 minutes. Drain on paper towels or a cooling rack, and serve with hot sauce!


Forget KFC - Watch This! - Incredible Fried Chicken Paprika recipe - By RECIPE30.com

http://www.recipe30.com/fried-chicken-paprika.html/

fried-chicken-paprika-848x477.jpg


Fried Chicken Paprika

Ingredients
Vegetable oil, for frying
4 chicken thighs or chicken breasts - No bones
1 tsp coriander seed powder
1 ½ tbs smoked paprika
½ tsp cayenne pepper
1 tsp onion powder
½ tsp Garlic salt
½ tsp white pepper
1 tsp baking powder
2 tsp salt
2 bay leaves
½ tsp brown sugar
1 cup buttermilk
2 eggs
1 cup all purpose flour (plain)
¾ cup cornflour (corn starch)

Steps
Step 1
In a mixing bowl, add the coriander, smoked paprika, cayenne pepper, onion powder, garlic salt, white pepper, salt, and brown sugar. Mix well.
Step 2
Flatten your chicken by placing in between cling film and lightly pound using a meat mallet or underside of a saucepan until an even size.
On your chicken pieces, sprinkle approx 2 teaspoons of the spice mix and coat each side evenly. Keep the rest of the spice mix for later.
Step 3
In a marinating container or mixing bowl, add the butter milk, 2 whole eggs, one tsp of salt and 2 crushed bay leaves, mix well. Add the spice coated chicken to the butter milk, cover, refrigerate and marinate overnight or a minimum of 2 hours.
Step 4
The following day or 2 hours later, remove the chicken from the fridge. Heat up your deep frying oil to a temperature of 340°F – 170°C
Step 5
While the oil is heating, add your leftover spice mix to a mixing bowl along with the all purpose flour, cornflour (cornstarch) and baking powder. Mix well. Remove the chicken pieces from the butter milk and place in spicy flour coating one at a time. Repeat process until each piece has been coated in flour mix.
Step 6
Place the chicken in the hot oil 2 or 3 pieces at a time until golden brown. Remove and place over a wire rack for the fat to drip. Serve immediately.

Little Tips
Always be cautious with hot fat, if using a pot don't overfill as it can easily catch fire. You can use chicken breast or thigh, with or without skin on. Marinating in brine for 24 hours will give you better results. (more moist) Great for a chicken burger with salad and aoli see my chicken burger recipe. Remove chicken from fridge at least 20 minutes before deep frying.
 
Last edited:

kaypohchee

Arch-Supremacy Member
Joined
Oct 10, 2005
Messages
15,493
Reaction score
600
Monday Meals

As it rained in the morning mom stayed in n didn't "exercise" - she fried up her lazy-women Luncheon Meat Cabbage Fried Rice for our Mon lunch with the unused Sunday lunch cooked rice (since had Shanghai Dumplings n Soup for lunch instead which she forgot all about altho' pre-planned n announced .... )
AuYa0Fdl.jpg


Tea
vMDmTgFl.jpg


Prepping the Corn Starch + APF etc n frying up the Garlic Chicken Wings for dinner
vHx2lCBl.jpg

BTvpkWCl.jpg

7Cem9nCl.jpg

oYO3Tm7l.jpg

jJdpHGBl.jpg

rXlfsZgl.jpg


Sent from Asus ASUS_Z011D using GAGT
 
Important Forum Advisory Note
This forum is moderated by volunteer moderators who will react only to members' feedback on posts. Moderators are not employees or representatives of HWZ. Forum members and moderators are responsible for their own posts.

Please refer to our Community Guidelines and Standards, Terms of Service and Member T&Cs for more information.
Top